
Wednesday, March 31, 2010
Denim Tote - Completed & the Return of the Bernina 930


One of the rivets didn’t set right, so I removed it and tried again. I am not sure what tool should be used for rivet removal, but this is what I did:

First, I lifted the edges of the rivet up with a screwdriver and then I cut off the stem using this tool. It worked and if I need to remove any other rivets, this is the method I will use.
- Lower and raise the feed dogs (they get stuck if not used)
- Run the basting stitch (yep – learned the hard way on that one)
- Make buttonholes (again, it keeps things from getting stuck)
- Use the embroidery stitches (specifically the honeycomb stitch as the needle has to go forward/backward and left to right to make the stitch)

Sunday, March 28, 2010
Bernina 930 - On the Mend & Making Room for the 403A

The Bernina is being serviced and should be ready for pick-up by the middle of the week. The pin on the clutch will be repaired or replaced. I forgot to ask which. Anyway, it will work again.
The basting stitch needs to be used periodically to lubricate the pin on the clutch. Not knowing this, I haven’t run the basting stitch and I doubt that it had been before the machine came to me. So, even if it is oiled properly, not using the basting stitch prevents the oil from getting into where it belongs. Eventually, the needle will not go up and down. This is what was explained to me. Lacking the mechanical gene, I have to trust.
I was informed that the feed dogs are like bald tires and the light bulb is on the way out. They will be replaced. Once again, I have to trust.
It was good to know that this was not caused by the denim. Yes, I have had guilt, and, well, I still do as this pin/clutch thing was a direct result of neglect. I am going to find out if there is anything else that I need to be doing to keep the machine in good working order.
The 403A has spent the weekend in Illinois and is scheduled to be delivered on Wednesday. I bought some machine oil and a few plastic bobbins, in case the metal ones don’t arrive when the machine does. The manual has been printed.
Also, in preparation for its arrival, I have been forced to critique the organization of my sewing possessions. There isn’t room here to add much more and that is why the 403A is coming without a cabinet. Where will I store it? The closet? No, not without an intervention.
So be it. There has been an intervention. The closet is no longer solidly stuffed from floor to ceiling. I would like to report that I had a gentle demeanor while this change was occurring. But, I cannot. There was much grumbling and stomping. The closet has been put right with the offending boxes moved to the shelves above. One can now actually enter the closet without removing boxes first. And, the items inside are easily viewed and accessed. A place has been made ready for the new machine.
The garage is next…..
Friday, March 26, 2010
Bernina 930 Repair and Singer 403A
I checked the Bernina into the shop yesterday. It may be a few days before they can examine it and let me know what needs to be done. While it is there, they will make sure that everything else is in good shape. It will also receive a professional cleaning.
Not having it here has created a void and made me realize that I need to have a backup machine. I have been shopping on Craigslist and eBay. I also visited a few thrift stores, but that was depressing. The few machines I found were broken, scratched, filthy and expensive.
I purchased a machine on eBay that met my requirements of strength and modest price: a Singer 403A. Yes, a Slant-O-Matic! The 403A has the streamlined style beginnings of the 500 series and just makes you smile to look at it.
This machine, like the Bernina, is all metal. In the eBay photos, a few chips in the paint are clearly visible and the rubber bobbin winder tire appears dried out and cracked. I ordered a replacement. I have also ordered some vintage Singer class 66 bobbins, and have downloaded, in PDF form, the manual. This should help me to get started right away. I will gather additional presser feet and cams once I know the machine is a keeper. It will also need a carrying case.
The 403A has been shipped.
Thursday, March 25, 2010
Denim Tote - Bernina 930 Defeated

The seam where those pins are is several layers thick. I had started the topstitching on the side seam where even more layers are folded. And, in case you are wondering, no, I did not hit a pin.
I use a lot of pins. I don't like to baste, unless I have to. I know that various tapes and glues are popular. For me, pins do the job.
The topstitching, besides being decorative on the outside, also fastens the bottom of the band lining to the tote. Of course, I did not follow the pattern instructions. The instructions have the tote lining sewn only at the upper edge, where the handles are. The lining is otherwise loose inside the tote - making for a messy look, don't you think?
The tote wants rivets. It shall have them.
Wednesday, March 24, 2010
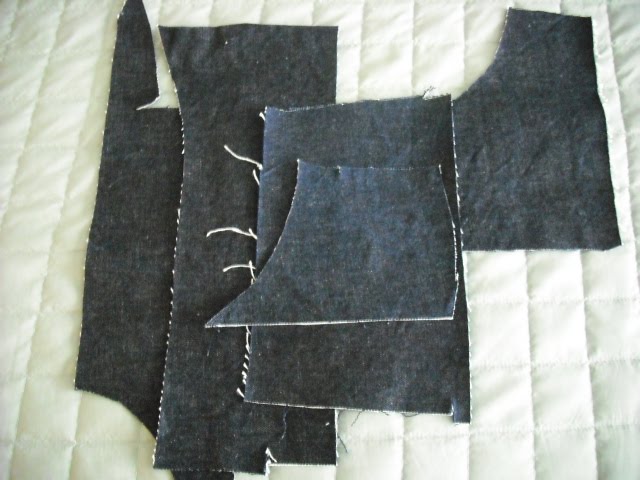
Denim Tote - Everything But The Oink
This is what is left after cutting out the tote - evidence indeed of my project manangement skills.


And what fabric, kind reader, do you think was chosen for the lining?

Tuesday, March 23, 2010
Machine Maintenance

 There is a large piece of the denim left. Enough to make this tote - the large one on the upper right. Oh, there are lots of rivets left, too.....
Monday, March 22, 2010
Jeans - A Few Photos


The best part of this project was hammering the rivets on at midnight! I had been excited about those rivets and wanted to attach them as soon as I could. I restrained myself as I didn't want them to needlessly scratch the clear extension table on the Bernina. As it was, the brass zipper did leave its mark.....
The jeans fit better on me than they do on this dress form, but I thought you might want to see them from a different angle. Sorry, I can't do much about the color. The photos above are more representative of the denim color.


Jeans - Completed
The waistband topstitching went well, except for the center fronts. For the first time, the Bernina skipped a stitch. I was half-inclined to leave it but it was very obvious. So, I ripped it out and tried again.
I cut another denim strip to use for the belt loops and serged the long edges. Those serged edges were brought to overlap, slightly, on the backside. Then, the strip was topstitched from the front, catching the three layers together.
After the buttonhole was made, it was time for the button and the rivets. I used a plastic cutting board to protect the table from the hammer. The jeans button went on easily and prior to putting the rivets on the jeans, I practiced my rivet attaching technique on a scrap of folded denim. Practicing was a great idea as a few sets were ruined before I got it right. By the way, the Dritz tool kit was a big help.
I will try to post some photos tomorrow.
Sunday, March 21, 2010
Jeans - Waistband


The waistband was sewn on, using a 5/8" seam allowace on the fronts and tapering to 1/4" at the center back. I went ahead and cut a strip of the denim for the belt loops and topstitched, per the pattern instructions. It looks nice, but it is four layers thick! A bit much, especially as it will be doubled over to attach to the jeans. I think I need to come up with a thinner version.
Saturday, March 20, 2010
Jeans - Almost Hammer Time


I put the jeans on the dress form so you could see how they are coming together. The dress form is shorter than me, hence the rolled up legs. I lightened the photos so the stitching would show up better - the denim is actually quite dark. The waistband and it's accompanying details (topstitching, belt loops and the buttonhole/button) need to be added. And, let us not forget the rivets.
So far, other than that awkward center back seam (which was due to not planning ahead) this has been an uncomplicated project. I am, however, expecting difficulty with the waistband. It will be a challenge as there are many layers of denim at the center fronts to deal with. The buttonhole will be interesting, too - also because of the number of layers.
I'm thinking that after trying this jeans thing a few more times, most of the fitting and style issues will be worked out. Makes me want to buy a roll of denim and practice. But, I may be speaking too soon. Let's see how the waistband goes.....
Thursday, March 18, 2010
Jeans - Back

The Bernina, with it's size 18 jeans needle, handled the thicknesses well. No skipped stitches. No complaining. It was wobbly, but due to operator error, not the machine. I didn't mind that this seam sealing stitching wasn't parallel with the first row of stiching. However, what I did mind was how the fabric wasn't turned under well at the yoke seam and at the curve. So, I ripped the stitching out and used tweezers to remove the bits of topstitching thread that were stuck in the layers of denim. Once the seam was cleared of debris, in an attempt to flatten the converging seams, I took a hammer to that area (where the presser foot is in the photo above). I didn't manage to compress the seam, but was successful in compressing my index finger. My advice: skip the hammer.....
Next, I tried a very hot iron with billowing steam. That helped. That, and basting the yoke area and the curve. I then sewed the seam again. It is okay. Not wonderful. Okay.
Before stitching the back pockets, I took denim scraps and played with the various embroidery stitches on the Bernina. I opted for straight lines for this first pair. I can get fancy later.

The front and back need to be sewn together and the waistband attached. After that, the hems. Oh, I almost forgot - the button and rivets. The hammer. I will be careful. I promise.
Wednesday, March 17, 2010
Jeans - Started

Prior to cutting the denim, it was washed in hot water and dried, using the hottest dryer setting, four times. I cut the jeans out, using Misses' size 18 and borrowing the back pocket from the Women's sized pattern. The length was shortened by two inches.


The front is almost complete. The fly topstitching needs to be done. No, they are not "mom" jeans. There is a one inch seam allowance on the waistband edge. The excess zipper will be cut off, but not until the waistband is put on. If it is cut now, I run the risk of the slider coming off. Patience.....
Tuesday, March 16, 2010
Jeans - What I Know So Far

Here are the front leg pieces from the two McCall's patterns. I don't think the story needs a lot of words. This is why I wanted to compare them. And the back pieces:

Seeing there was a such a significant difference, I compared both patterns to my Eddie Bauer (EB) jeans. The Misses' pattern, size 18, is fairly close to the jeans. The finished leg bottoms are about 2" larger on the pattern than the EB jeans. That can be changed. Also, the back pocket is shorter on the pattern, too short. I am going to borrow the back pocket from the Women's pattern as it is almost the size of the back pocket on the EB jeans. I selected a piece of unpleasant grey polyester and sewed the muslin.


I didn't bother to sew on the waistband as it is a straight strip of folded fabric. The finished height measurement is similar to that of the EB jeans. Had the waistband been curved, I would have tested it on this muslin.
By the way, the muslin fit well.
By the way, the muslin fit well.

I tried out the topstitching thread. Of course, right after I ordered it, I read (just about everywhere) that upholstery thread should be used for topstitching jeans, not topstitching thread. Huh?
Deflated, I decided to use it anyway and threaded the Bernina, using one of the size 18 jeans needles and all-purpose thread in the bobbin. It seemed to do fine. I haven't played with it on the denim yet - waiting until I have scraps. The seams are not flat felled in the pattern instructions. I think that will be acceptable, except for the crotch seam. If you look closely at the above photo (near the center), you can see white thread showing at the seam. And that is without a body putting stress on it. As you know, I do not have a flat fell foot. It is not necessary to have one to do a flat felled seam, just easier. The challenge, if I try a flat felled seam, will be the center back yoke seam, where all of those layers come together.
This first pair of jeans is really an experiment and I don't know if flat felled seams should be the focus of the testing. Right now, I'm thinking good fit and appropiate style are what I need to be concerned with. But, what good is that if I bust the seam the first time they are worn?
Do you think the ole' Bernina can handle all these layers of heavy denim? Cross your fingers....
Saturday, March 13, 2010
Jeans - The Rivets Have Arrived!

The color is what I was expecting and they are not too shiny. DD#2 bought me a Dritz jean rivet tool kit to attach them. From what I can tell, the only other tool needed is a hammer. Well, I also need a nail and maybe a scrap of wood, to protect the floor from the hammer.

I picked up this pattern, McCall's 5142. It is similar to the other McCall's jeans pattern, but it is a Misses' size, not a Women's. I border between Misses' and Women's sizes and, according to the pattern measurements, this one should fit me, too. After comparing the two, I may morph them, depending on what I see. From past experience, I know that changes will be made, regardless of which side I choose. For this project, I have decided to choose both.
I finally cut out the pieces for the mock wrap t-shirt. This will be another muslin as I altered the inset piece to attach at the shoulders and the armscyes. The 1/4" folded-over front edge finish will be replaced with a band. The sleeve hems will also be finished with the same type of band: a folded rectangle that is slightly stretched as it is sewn to the other pieces.
Friday, March 12, 2010
Jeans - Gettin' My Ducks in a Row

Look what came to the house today! I have also ordered antique brass jeans rivets from Grommet Mart. Time to trace the pattern and find some unloved fabric to use for a muslin. I'm excited!
Tuesday, March 9, 2010
Jeans - Upcoming Project

Shopping for blue jeans has been painful and most always, unsuccessful. Too long, too short, never quite right. And, price doesn't matter. $8.00 or $108.00. Fail. So, I am willing to try sewing them. Afterall, I do possess the workhorse Bernina 930 and it's jeans foot, #145, and the blind hemming foot, #016. I haven't used the jeans foot before. As for the blind hemming foot, I know that beautiful topstitching is but one of it's special talents. Will I need a flat fell foot? If I do, I don't have one. But, I bet eBay does.....
The jeans pattern frequently used, successfully, on the various sewing blogs is Jalie #2908. Though the pattern measurements would work for me, I already have the jeans pattern pictured above, McCall's #5894. This is a Palmer/Pletsch "Classic Fit" pattern. After looking at the measurements, I think I will start with size 18W. That "W" after the 18 means it should have a better chance of fitting me and therefore gets approval for testing.
I have a piece of denim that I purchased from Fabric.com a few months ago, but other items are needed, too. For notions, I ended up at Atlanta Thread & Supply Company. I ordered Levi gold topstitching thread, a few brass zippers, jeans buttons and last, but not least, jeans sewing machine needles. I didn't see jeans rivets on their site. This pattern doesn't include them, but if I had them, I would use them.
So far, I have spent $.99 for the pattern, about $12.00 for the denim and a few dollars for the notions. Not a huge investment. Especially, if it works. If it doesn't, uh, maybe I will have to purchase the Jalie pattern. Oh, I do have the Bernina My Label jeans pattern. Logic would say that I should start there.....
I haven't forgotton about the mock wrap t-shirt. I also need work on pants.
Monday, March 8, 2010
Simplicity 4586 Blouse - Completed


To make a buttonhole on the Kenmore, you place your chosen button into the slot on the back of the buttonhole foot. It makes the buttonhole the perfect size for the button. You can sew as many buttonholes as you please and they will each be exactly the same. I used it for the buttonholes on this blouse. It did a great job! It is worthy and won't be packed away again. Yeah!
My button sewing technique has improved. After sewing the buttons on, using the Bernnina 930 and the awesome #18 foot, they were finished by hand. For each, I threaded a needle with the two front thread tails, sewed through the button, and took a few stitches on the back. I then tied the threads off, including the two back threads. It took a few minutes to do, but they are secure.
The only other non-machine sewing was the tacking of the back facing to the shoulder seams. It could have been done by machine, but the needle was there and it was just a few stitches on each side. I didn't mind.
Friday, March 5, 2010
Work in Progress - Simplicity 4586

I worked on the blouse today. Obviously, the sleeves need to be set in and the buttonholes and buttons sewn on.
This has been a simple project so far. The only part that wasn't plain vanilla sewing was attaching the straight collar onto the curved back neck edge. And that wasn't hard, at all. Using small scissors, I made a few short clips on the neck edge and it fell into place. Easy.
When cutting the fabric, though, I did stress over the large swirls and where to have them placed (or not placed). I finally realized that it didn't matter and just cut the pieces out.
Like the Vera Wang shirt, I used Pellon Shir-Tailor interfacing for the collar and facings. This blouse doesn't have cuffs, but I did add a strip of interfacing to the sleeve hems. It will be interesting to see what these interfaced garments will look like after a few trips through the washer and dryer. If the interfacing doesn't shrink, separate, get all bumpy or have some other as yet unimagined trauma, I will have to consider buying a bolt of the stuff. It does make a crisp collar.
Wednesday, March 3, 2010
Muslin for Simplicity 4586, View A

I cut the pattern pieces down to a size 20, except for the side seams which were left at size 22 and made another muslin. This one is much better. From the original pattern, two inches were added to the hem and the sleeves were shortened by one inch. I also raised the center front neckline an inch and a half. I used a French curve to redraw the neckline and modified the front facing to match.
Anyway, I was able to move freely when I tried this one on. It wasn't too tight or too big. I am going to sew it up!

Tuesday, March 2, 2010
Simplicity 4586 and Pattern Weights

I am paralyzed on the mock wrap t-shirt. I am, therefore, taking a break and have traced a blouse pattern, Simplicity 4586, another "Threads Collection" offering. Old and out of print, but a style I like and, if it fits, has the promise for many variations. I pinned the tissue pieces together and tried them on the dress form and the fit seemed okay. I then compared the pieces to my Bernina My Label shirt pattern. The sleeves and the armscyes are different. Where one area is too little, the corresponding piece is too large and vice versa. The total amount seemed close, so I'm gonna go with it. As you can see, I generously added to the side seams.

Subscribe to:
Posts (Atom)