Showing posts with label Style Arc. Show all posts

Sunday, September 1, 2013

The Jenny Shirt - Sleeves


Life got in the way last week and there has been no sewing. None. However, since my last posting, I was able to attach the cuffs to the sleeves and sew one of the sleeves to the shirt.

Back when I traced the pattern, I shortened the sleeve length by one inch because shortening sleeves by one inch has become my standard sleeve adjustment. Once I tried the shirt on, I realized I got it wrong, I’ll have to shorten the sleeves another 1 1/4”. For now, I folded the cuff to the right length – the cuff isn’t that narrow. That is also why the placket isn’t laying flat. Pins and folded fabric, what can I say?

Really, I should just cut new sleeves, plackets, and cuffs and start over. Yet, I won’t because this is a muslin. I’ll remove the cuffs, cut 1 ¼” off the bottom of each sleeve, gather and pleat until it matches the cuff. The plackets are plenty long enough to handle this treatment and since it is a woman’s shirt I think I can get away with a bit of gathering.


Once I get the sleeves in, there is hemming, buttons and buttonholes…say, another two weeks? Hah. Maybe more as the next few weeks promise more of the same time suck for my sewing time.

Style Arc Barb's Stretch Pant
I’ve also started another pair of pants using Style Arc's Barb's Stretch Pant. Just need to attach the waistband and hem. Though narrower, construction of the Barb is the same as the Linda - incredibly easy.

Oh, in a positive move toward finishing the quilt, I broke down and purchased another LaPeirre Studio Supreme Slider. Yes, you should be impressed…

Sunday, August 18, 2013

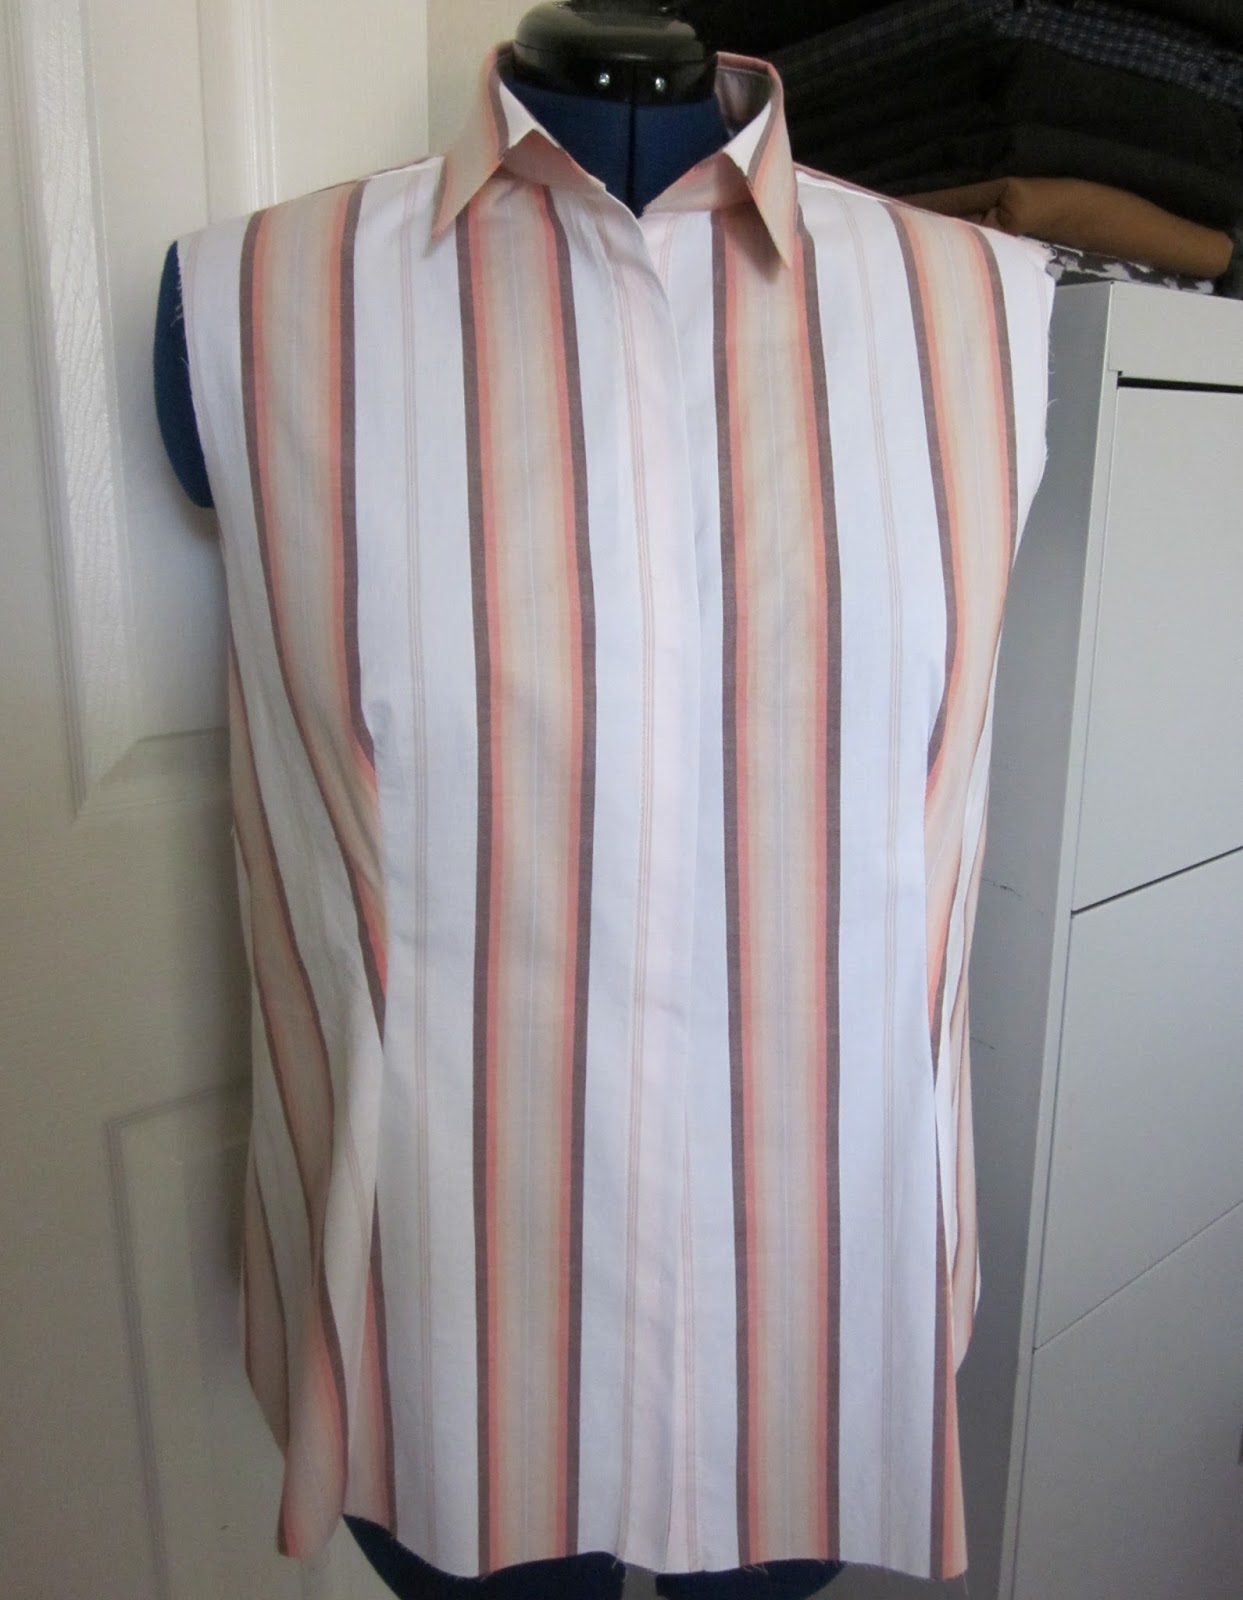
In Progress: Style Arc’s Jenny Shirt


By now, you know that I am not a blogger who worries about how many yards I sew per month or keeps track of the dollars spent per garment. If I really cared, I suppose I could export a report from Quicken to Excel and break it down by notions, patterns, fabric, equipment, etc. Just know that I really do not care. This sewing thing is both my hobby and my wardrobe. Some people play golf or go to the movies. I sew. 

I buy fabric (mostly on clearance) and patterns (fewer and fewer of the Big 4 lately) that I think will flatter my body and sew it up. Happily, the vast majority of things I make become part of my wardrobe and the few that meet the bin are not mourned. I learn and I move on. One of my challenges is to sew a well-fitting classic shirt. I have sewn the shirt pattern from the Bernina software (Bernina My Label) a few times (here and here); the resulting shirts fit, and I’ve worn them a lot. However, since each of the Style Arc patterns I have sewn have worked so well I wanted to attempt a Style Arc shirt. I chose the Jenny Shirt.

Style Arc Jenny Shirt
 
I had cut this out shortly before (or right after???) moving into my apartment. Anyway, it has been passed over for several months and I finally got around to sewing on it about two weeks ago. The fabric is a $1.00/yd stretch cotton from FabricMart.com, and yes, I have several yards of this one and another similar stripe. You will be seeing it again.
After getting home from the office, I would sew for ten or fifteen minutes before deciding I didn’t like the lighting or I was too tired, etc. Given this pace, I project that it will be another two weeks before it is complete.
 

I wasn’t expecting how the front darts pull the side fronts to the bias. I like it!

Changes made to the pattern? I shortened the sleeves an inch and smoothed out the side seams at the waist. That extra at the waist might not be needed; I’ll wait until it is further along before I commit.
 

I wish I had made an effort to center the stripes on the back piece. When I cut this out, I probably was considering this an unwearable muslin and opted to conserve fabric. There isn’t a guarantee that the shirt will turn out nor do I want to spend time with the seam ripper, so I’m not looking back. Once I have a pattern that works, I’ll take more care. I do want to figure this shirt thing out. To that end, I’ve printed several tutorials that deal with specific parts of shirtmaking and have put them into a notebook. The plan is to update as I come across better techniques.


I guess it is time to start digging through my buttons. Hope I can find some that match.

Enjoy your week!

Sunday, August 4, 2013

Fabriconda #6 – Style Arc Riva Raglan T-Shirt and the Jalie Scoopneck Top


Another lucky unused pattern, the Style Arc Riva Raglan T-Shirt, was chosen for the plaid knit from the Fabriconda. Like most of the Fabriconda fabrics, this one had lots of tape and tape residue. I cut all of that tape stuff away before starting. That way I knew exactly what I had to work with (barely just enough!).

Style Arc Riva Raglan T-Shirt

Looking at the pinned together pattern on the dress form, I could see that the neck was close fitting and the hem long. My only modification was to smooth out the side seams a bit for more room at the waist…

I wore it last week with my Burda Style 01-2010-136/Ottobre bird Capri’s and some cute sandals. The shirt fits nicely and I was comfortable. Enough said.

However, the Fabriconda has freed me up to try patterns that I’ve been hesitant to try. Testing a new pattern is often risky and for that reason alone, it has been well worth the $7.00 spent. After all, patterns aren’t much good if they don’t get used.

And yet the next top did not come from the Fabriconda.  This Fabric Mart ITY has been on the shelf for several months. With confidence from the success of the Jalie Raglan Tee, #3245, I went forward with the Jalie Scoopneck Top, #2806.


This is view B with the 3/4 sleeves from view A. The fit and comfort of this top is simply wonderful and the style is appropriate for office garb. I’m restraining myself from gathering every piece of knit fabric here and turning them into this top! Seriously, I so wish I had attempted this one a long time ago!

Jalie Scoopneck Tops #2806

Oh, the quilt has been calling my name…

Thursday, July 25, 2013

Fabriconda #5 - Style Arc Island Ali Top


Two pieces of knit burnout from the Fabriconda came together to make this top. The blue piece had a huge circle cut from the middle and what was left was the perfect amount for the sleeves. Sadly, I didn't have enough of the grey to center the front properly (yes, I cut it after the back...). I also had to cut the lower back piece on the crosswise. Just know that I'm going to wear it anyway and the world will go on...


The wooly nylon thread came out of the drawer and I used it for the rolled hem on the sleeves. I really like how it allows the fabric to drape nicely.


Style Arc Island Ali Top Sewing Pattern

I hadn't sewn a top like this before, so before starting, I read the instructions (pretty basic but adequate) and had to look to the pattern pieces for the hem length and a few other things. As I've found typical with Style Arc knit top patterns, I had to shorten the neck binding (guessing worked). Other than that and the rolled hem for the sleeves, there weren't any other changes.


I will wear this with a pair of grey Capris I'd made a few months ago. This top is far from perfect but for a wearable muslin I'm pretty happy about it and I'll definitely sew it again! I think it would make a nice dress, too. Don't you?

Wednesday, July 24, 2013

Fabriconda #4 – Style Arc Abby Cardi


I’ve spent the past few weeks building a stack of prepped patterns. When it threatened to fall over, it was time to begin matching them to fabric.


One of the patterns, the Style Arc Abby Cardi, I’ve had since it was first offered but I wasn’t ambitious enough to change out the plate on my old serger to sew a rolled hem. Now, with the new one, I just have to turn a knob and I’ve been looking for an excuse to try it. The manual recommends using wooly nylon thread in the upper and lower loopers, but there was only black and white wooly nylon in the drawer. So, red serger thread was the choice and it worked just fine. I used a large eyed needle to pull the tails through the hem threads on the back and applied a bit of Fray Check to seal after trimming.

 
Soon after I got the new serger, I bought it a present: an elasticator presser foot. I’ve been looking to streamline the clear elastic/twill tape shoulder procedure and for a few dollars thrown at eBay I was able to do that. The foot feeds the elastic through while encasing it in the stitching. You can adjust how much you want the elastic stretched while stitching; say, for example, when sewing elastic to the leg of a swimsuit. For the shoulders, I let it feed the elastic without any stretching. I understand that the purpose of the foot is to evenly stitch stretched elastic onto fabric but I don't know why I couldn't also use it to run twill tape onto woven fabrics. Another experiment for another day...

Elasticator Foot - Side View

Elasticator Foot - Top View

There were two pieces of the red knit fabric within the Fabriconda and both had wide masking tape residue parallel to the selvages. It was tricky business getting the pieces to fit and there was just enough leftover to test out the rolled hem.
 

I did not make many changes to the pattern. Just the usual one inch taken from the sleeve length and straightening of the side seams to provide a bit more room for my mid-section. It wasn’t necessary. In fact, the cardi was shapeless and baggy. I went back to the original pattern side seams and I think it looks great!

With the Texas high temperatures, I doubt I’ll get to wear it before October. No problem as this was all about testing the pattern, the rolled hem, and the elasticator foot. All were successful and in the meantime, I intend to sew the short-sleeved version in a lightweight knit to wear over a camisole or tank.

Next? I’m thinking Style Arc’s Island Ali Top combined with more fabric from the Fabriconda.

Tuesday, July 2, 2013

Style Arc's Gorgeous Gore Skirt


I was looking through my basket of “want-to-sew-soon” patterns on Sunday and came across Style Arc’s Gorgeous Gore Skirt pattern. I’ve been wanting to sew a simple summer skirt and this one fit the bill: no zipper or sewn-on waistband.

Style Arc Gorgeous Gore Skirt

Less than two hours later, I had my new skirt and I absolutely love it! The animal print ITY came in a Fabric Mart bundle. I hadn’t considered it for a skirt, but the fabric is perfect for this pattern.

There are only two pattern pieces, the upper yoke (front and back use the same piece) and the gores (six – again, all the same). I used ½” elastic for the waist instead of the 1/4” specified. Why? Because that is what I had in the drawer and it worked just fine.

Other changes? I under-stitched the yoke facing, using the coverstitch, instead of top-stitching through both layers at the skirt top. Also, the coverstitch was used for the row of stitching beneath the elastic. The waist has to be able to stretch to get over the hips. No way straight stitching won't pop.

I wore my new skirt to the office on Monday and I felt dressed up, yet so comfortable! I think I’m on to something here…

Sunday, February 24, 2013

And I Thought a Ruler and a Darning Foot Would be Enough…


The Bernina has returned. It had a thorough cleaning, a check-up/tune-up and, fortunately, nothing was seriously wrong. Something had come loose on the inside on the hand wheel and it just needed to be tightened. It works great and I am delighted to have it back!

The more I read quilting books and blogs (and watch YouTube quilting videos), the more I realize the same tools keep showing up and I get to thinking that maybe I could use a few of them. Now, don’t you worry, I haven’t gone and bought a mid-arm sewing machine, but the following have made their way to me:

  • A Supreme Slider free motion machine quilting mat (has a Teflon top to allow the fabric to easily slide across the bed of the machine)
  • Machinger gloves (the fingertips have a polyurethane coating to get a better grip on the fabric sandwich as it is being quilted)
  • Teflon bobbin washers (placed in the bobbin case before adding the bobbin, they encourage better tension and stitching)
  • Pinmoors (easier to use than safety pins to keep the layers together)


I'll let you know how these work for me.

My current strategy has the blocks joined into three strips with each strip two blocks wide and seven blocks long. I am hoping it will be easy to quilt the strips leaving about two inches unquilted on the inner edges. Once the strips are connected, I’ll come back and quilt those blank areas. It works in my head…


While waiting for the Bernina, I put together a new top using a pattern I've been curious about. The fabric is from a FabricMart.com bundle and the pattern is the Style Arc Cate’s Cousin top. Both pattern and fabric have been here awhile – and with winter about over, my timing is definitely off. However, I’d rather have a top waiting in the closet than folded fabric on the shelf.


Next? A free motion quilting experiment involving a block that did not measure up. Stay tuned.

Sunday, November 25, 2012

Style Arc Susan with Amy Cowl


With DD#1 married and moved, I've realized I don't need as much space and I'm not really interested in the upkeep of a house. So, I moved. I am now living in a 900+ square foot apartment. That means no grass to water and mow but also no yard. The little dog loves the balcony and is adjusting. For me, the biggest change is my daily commute. It is so much easier now and once I get the sewing space settled (below), I think this is going to work just fine!


Naturally, I’ve spent the last few weeks getting organized. Still much to do, but I’m tired of the whole process and needed a break. I pulled out the Style Arc Susan and Amy top patterns and decided to merge them. For my experiment, I used the leftovers from a dress I had sewn in the summer, a FabricMart.com ITY. There was just enough to cut ¾ length sleeves. Usually, it takes about an hour and a half for me to complete a t-shirt. This one took at least two hours.


My goal was for a slightly different neck finish than the original Amy cowl. To get there, I removed five inches from the cowl to make it fit into my tweaked neckline. I folded the traced cowl pattern piece at center front and sewed a 1/2" seam, taking up one inch. Another inch was taken from each of the remaining notches. I could have taken the scissors to it and found some tape, but this was easy. What can I say?


The collar ended up about two inches less than the neck opening and just about perfect. Oh, I also raised the neckline on the back a bit to encourage the collar to stand up. I guessed as to the amount. Mostly on the sides and a small amount (maybe a 1/4"?) at the center back. It worked...

While I was at it, I went ahead and cut out two pairs of pants and a few tops. Hope to show them soon!

Wednesday, October 17, 2012

Three Patterns Tested


Once this sparkly and heathered ITY knit from Fabric Mart showed up, I questioned what caused me to choose it. Could it be the $1.00/yard price? Well, yes, price indeed was the factor that compelled me to purchase 10 yards. Based on other ITY knits I've sewn, I was expecting more stretch, but at $1.00/yard, I've nothing ugly to say. Not perfect, but plenty good enough for assessing new patterns. By the way, this purple above is more indicative of the fabric color than the other photos.

I've had the Style Arc Creative Cate pattern for awhile and had hopes that it would be wonderful. It almost is. Notice the horizontal line at the bust point. I believe that means more fabric is needed there. I never ever need a FBA (full bust adjustment). Ever.

Though the bust measurement of the dress form is the same as mine, the horizontal line doesn't show up when I'm wearing the top. So, if I use a stretchier knit, will the top then be too loose? Looks like I'll be digging another knit out of the stack to find out...I like this style. A lot. The horizontal line? Not so much.


Next, I tweaked the measurements on the Bernina My Label t-shirt. I serged one shoulder (with clear elastic, of course) and switched to the coverstitch. The self-fabric strip refused to cooperate with the binder despite given several opportunities. Eventually, it was replaced with a cotton knit from the scrap box. Can't say that this is my favorite combination, but I was able to finish the project.

This version is too wide across the upper front and there is something odd with the bust at the side seams. While wearing this top, I notice that the fabric wants to make a bust dart - see the wrinkles on the right. On me, I get one large fold. There is too much fabric, but I don't know what measurement/s to change to make it go away. Do you? I suppose I should compare the measurements to my original pattern and that would tell the story. No matter; I'll revert to my older BML t-shirt pattern.

Even if this one isn't a great fit and is a bit strange, I'm gonna wear it anyway. Yep, I am...


The third pattern sampled is this oldie but goodie Burda 1-2006-131. Burda being Burda, I knew better and yet didn't bother to raise the neckline. However, I did skip the center back seam. To avoid using the binder for the neck finish, I added 1/4" seam allowance and serged the self-fabric strip, right sides together, to the top. Then, I folded the strip up and over the seam allowance and coverstitched to secure the back side of the strip to the top. I prefer to use the binder, but I sure did not want another purple top with peachy/orange binding. One is quite enough, thank you.

I chose ivory thread for the contrast top-stitching (coverstitched) as the purple blended with the fabric and the seams disappeared. This pattern will be better once the neckline has been adjusted to a Tammyriffic level (I'm guessing about an inch to an inch and a half).

Burda 1-2006-131
Okay, of the three, the Creative Cate is my favorite. I'm gonna pass on the BML tweaked version as the older one is better. The Burda pick is worth fine-tuning the neckline.

There are still yards of this fabric left...

Monday, May 7, 2012

Style Arc Anita Peasant Blouse


My new blouse is made from a teal rayon challis print purchased from Fabric.com nearly a year ago. I love it! The cropped pants, Burda Style 02-2011-123A, were sewn last April and have become a favorite.

I have been sewing other garments, too. I put together a pair of the Style Arc Peta cropped pants and another pair of the Ottobre Every-Woman’s Pant (05-2008-16). And, waiting their turn by the Bernina, are the cut pieces for the Style Arc Katherine pants. I’ll get you some pictures soon. By the way, the Style Arc Susan t-shirts fit well and are comfortable. I’ve retraced the pattern with the changes and am ready to make more.

BIG NEWS: DD#1 is getting married! I am making my dress for the wedding and I need to finalize the design and get busy. So far, I have a beautiful turquoise/Capri blue embroidered silk organza that I want to use for a shrug/little jacket thingy. There are also several yards of matching silk dupioni on order for the dress. It will be floor length and fully lined. 

I’ll definitely be stitching a muslin first. Now, the dress should be underlined, right? With silk organza? Bodice only? What is typical? I suppose I’ll need to figure out how to do an invisible zipper/lining combination…

Ah, a learning opportunity…

Sunday, April 1, 2012

Style Arc Susan Top


I keep reading good things about Style Arc patterns. Enough, that I finally placed an order. I went with my measurements for choosing a size and once my patterns arrived, I knew I wanted to start with the Susan Top. After all, you really can’t get more basic than a t-shirt. I traced the pattern and compared it to my Bernina My Label t-shirt. Of course, the sleeve piece was too long. The rest, however, wasn’t too far off and curiosity dictated that I sew it up without any other changes. I pulled a leftover stretch jersey ITY to do the experiment. Yes, you have seen this fabric before.

I put clear elastic into the shoulders only because it took such a small amount and hoping I might actually want to wear the muslin.

The instructions have you turn under the neck edge and top stitch. Instead, I cut a strip two inches wide and did the usual neckband and coverstitched around the outside of the seam once it was sewn on. It helped to fill in the neck area.


I didn’t have enough fabric for long sleeves, so ¾ length for this one.

The resulting t-shirt fits me really well, yet could be a tad shorter. I pulled another less-than-wonderful leftover fabric, a matte jersey, made a few changes and made another muslin. I took an inch off the hem and morphed a new sleeve hem using the cap sleeve from view C (the pink one on the upper right) of Simplicity 5502. Yeah, long OOP, but in the pattern file and handy.


I kept the 2” neck band because I was lazy.  I didn’t steam the fabric this time; I merely pressed with a warm, dry iron. Remember - this was the fabric that grew.


I am going wear both of these t-shirts before making any more from the pattern. I have to tell you, so far I’m pleased, and the sting from the postage is quickly fading!