Showing posts with label Bernina My Label. Show all posts

Wednesday, October 17, 2012

Three Patterns Tested


Once this sparkly and heathered ITY knit from Fabric Mart showed up, I questioned what caused me to choose it. Could it be the $1.00/yard price? Well, yes, price indeed was the factor that compelled me to purchase 10 yards. Based on other ITY knits I've sewn, I was expecting more stretch, but at $1.00/yard, I've nothing ugly to say. Not perfect, but plenty good enough for assessing new patterns. By the way, this purple above is more indicative of the fabric color than the other photos.

I've had the Style Arc Creative Cate pattern for awhile and had hopes that it would be wonderful. It almost is. Notice the horizontal line at the bust point. I believe that means more fabric is needed there. I never ever need a FBA (full bust adjustment). Ever.

Though the bust measurement of the dress form is the same as mine, the horizontal line doesn't show up when I'm wearing the top. So, if I use a stretchier knit, will the top then be too loose? Looks like I'll be digging another knit out of the stack to find out...I like this style. A lot. The horizontal line? Not so much.


Next, I tweaked the measurements on the Bernina My Label t-shirt. I serged one shoulder (with clear elastic, of course) and switched to the coverstitch. The self-fabric strip refused to cooperate with the binder despite given several opportunities. Eventually, it was replaced with a cotton knit from the scrap box. Can't say that this is my favorite combination, but I was able to finish the project.

This version is too wide across the upper front and there is something odd with the bust at the side seams. While wearing this top, I notice that the fabric wants to make a bust dart - see the wrinkles on the right. On me, I get one large fold. There is too much fabric, but I don't know what measurement/s to change to make it go away. Do you? I suppose I should compare the measurements to my original pattern and that would tell the story. No matter; I'll revert to my older BML t-shirt pattern.

Even if this one isn't a great fit and is a bit strange, I'm gonna wear it anyway. Yep, I am...


The third pattern sampled is this oldie but goodie Burda 1-2006-131. Burda being Burda, I knew better and yet didn't bother to raise the neckline. However, I did skip the center back seam. To avoid using the binder for the neck finish, I added 1/4" seam allowance and serged the self-fabric strip, right sides together, to the top. Then, I folded the strip up and over the seam allowance and coverstitched to secure the back side of the strip to the top. I prefer to use the binder, but I sure did not want another purple top with peachy/orange binding. One is quite enough, thank you.

I chose ivory thread for the contrast top-stitching (coverstitched) as the purple blended with the fabric and the seams disappeared. This pattern will be better once the neckline has been adjusted to a Tammyriffic level (I'm guessing about an inch to an inch and a half).
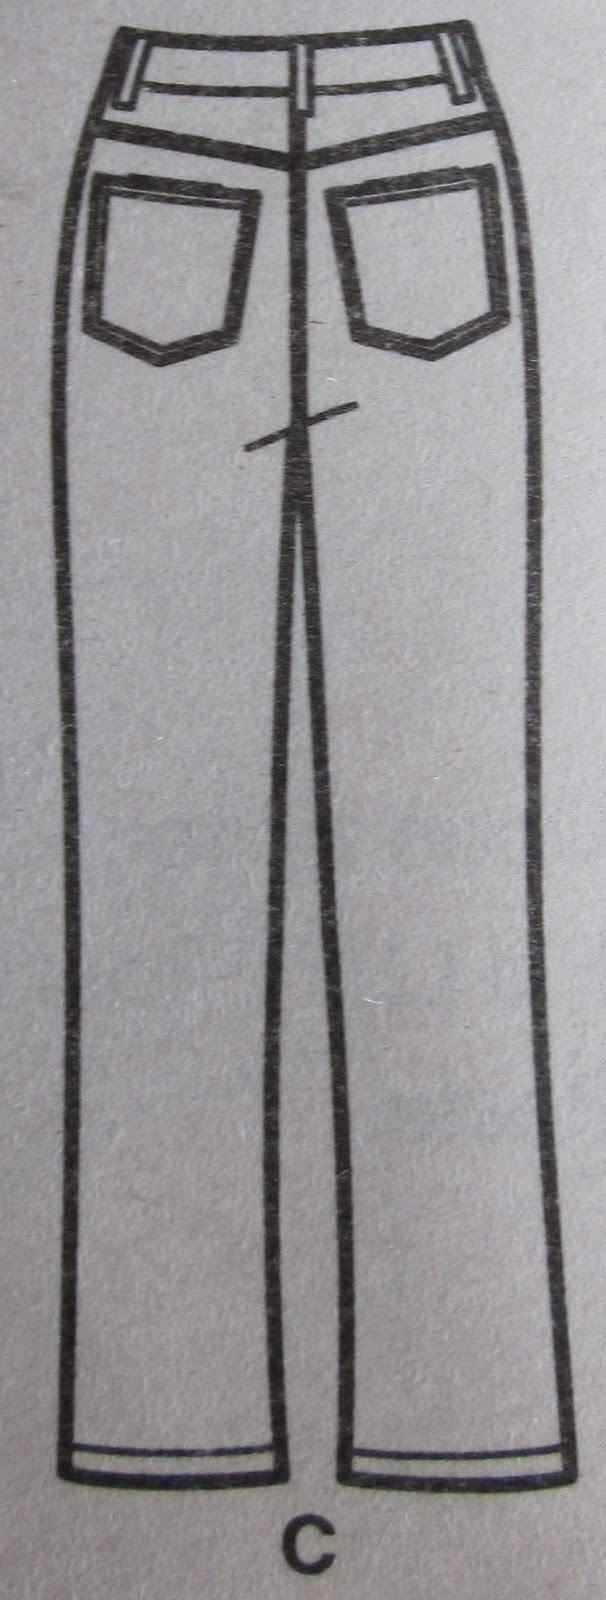
Burda 1-2006-131
Okay, of the three, the Creative Cate is my favorite. I'm gonna pass on the BML tweaked version as the older one is better. The Burda pick is worth fine-tuning the neckline.

There are still yards of this fabric left...

Wednesday, June 20, 2012

Sunday, May 27, 2012

Muslin for MOB Dress

Bodice: Bernina My Label princess seam dress
  • Bodice shortened to fit midriff
  • Neckline lowered (may be lowered 1/2" more)
  • Outer shoulder narrowed by 5/8"
  • Gathers added to center front
Midriff: Butterick 4510 Maggy London, from 2005 (OOP)
  • Pin-tucks, pleats, ruching or alternative will be included to add interest (lining pieces were used for this muslin)
Skirt: Burda Plus Autumn/Winter 2011 425A
  • Skirt height trimmed to meet midriff at waist
Jacket:
  • To be determined...

Sunday, February 19, 2012

It Works!


The shirt has been finished, worn and is now resting in the hamper. Though the fabric is not feminine, my greater concern was the fit. It both fits and is comfortable. I look forward to sewing the next one using prettier fabric. But, hey Mary Nanna, at least it isn’t denim!
 
For this shirt, it didn’t make sense to bother with flat-felled seams if I wasn’t sure what my seam allowances were going to be. Nor did I bother to do a rolled hem. Instead, I serged the edge and folded it up. It looks fine…

I am happy with the sleeve cap adjustment. I have very little knowledge of sleeve cap theory, but I do know that this looks much better and I’m glad I made the effort to tweak the pattern.


I fired up the 403A for the buttonholes. However, prior to the buttonholes, I had to find buttons. There were some natural shell ones in the stash (I’m fairly certain they came from Fashion Sewing Supply). They are ever so slightly larger than I preferred, so I took myself to both Hancock’s and JoAnn’s. No surprise, but neither store had buttons that would work. They were too big, too small or not enough of them in the same size. I gave up, went home, and made buttonholes to fit the natural shell buttons.

Next time, I want to shorten the bust dart. Now, don’t get me wrong, this pattern, just as it is, fits better than anything I could hope to find in retail, but still I think there is room for improvement. I like the shaping the bust dart provides, but it really needs to be less obvious, if only a little. I think I can figure this out. Don’t you?
 
I haven’t had a chance to try out the Lands’ End sleep shirt pattern yet as I keep changing my mind about which fabric to use for the testing…

Sunday, January 29, 2012

Starting to Look Like a Shirt!


My goal was to finish this today. It still needs a hem, buttonholes and buttons.

The sleeves went in easily but the proof will be in the wearing. Sure, it fits when I try it on, but how comfortable will it be at the office?

Even though I'm considering this a muslin, I went ahead and tried a different cuff technique. Yes, I was supposed to be focused on the adjusted sleeve pattern for this shirt. I got sidetracked.

Sherry, over at pattern ~ scissors ~ cloth, has a wonderful tutorial (under her "Tricks of the Trade" tab). I tried it for this shirt and it really was a "Duh" moment for me. Why I hadn't tried this before, I do not know. Thank you Sherry! What a generous gift!

So, improvements to date:
  • Sleeve cap - smoother
  • Interfacing quality - lovely result
  • Cuff technique - easy and perfect - you really need to try this! 
This is encouraging. Makes me want to sew more shirts...

Tuesday, January 24, 2012

Little by Little


It is dark here. Rainy and dreary too. And, I’m embarrassed to show you these photos. I’ve tried, (really I have!) to come up with better looking ones.


The jeans were finished almost two weeks ago and the shirt is slowly coming together. No longer entertained by needles breaking and flying while zigzagging belt loops onto several thicknesses of denim, I’ve decided to sew fewer of them. This explains why you see two, not three belt loops on the back. I’m not liking the look, but hey, I don’t wear tucked-in shirts and no one (other than us) will ever know. This is my solution until I can figure something else out.

 
Oh, now don’t fret about the collar stand – it isn’t yet attached to the shirt; it's not even pinned. As you can see, I haven’t made it to the sleeves either even though I’m anxious to see if the cap/bicep adjustment is going to work.

 
Once I get a pattern I like, I plan to step up to the opportunities for tabs, pockets and maybe some pintucks or ruffles. This round is simply to let me know if the sleeve is better. Call it a muslin or toile. Take your pick...
 
Along with the new sleeve pattern, I am also trying out a new-to-me fusible interfacing from Fashion Sewing Supply. This one is Pro-Woven Shirt-Crisp interfacing. You can’t tell from the photo, but the collar looks great! However, I’ll hold off buying any more until I know it’s gonna survive the washer and dryer.

I am curious to see what happens to this stuff. I don’t hand wash any of my clothing (does anyone?) but I make considerable use of the delicate cycles. It needs to take a few trips to the laundry room and come back looking good. I think that is a fair test.

Side seam at hem of worn Lands' End Sleep-T
 
I’ve noticed my Lands’ End Sleep-T’s have seen better days. I’ve worn dozens of these over the years in various colors and prints. Usually, I order several at a time, all the same size, color and print (translation: whatever is on the overstock page in my size) and wear them until someone tells me I should be ashamed…Well, I am ashamed but they are now $39.50 each. I have to admit they are worth every penny, but I’m realizing I could buy a lot of fabric and/or other sewing goodies instead. Therefore, planning ahead, I am going to take the worst looking one and make it a pattern. The way I see it is there isn’t much to loose if it doesn’t work…

Monday, January 2, 2012

Bernina My Label Tailored Shirt Pattern


In looking at the sleeve cap of my BML shirt pattern, I decided that it really wasn’t too wonky looking. You know – having an obvious bump that is begging to be smoothed out. I could take some off the top of the cap to help it fit better into the armhole. However, it occurred to me that I had added to the bicep measurement in the style settings before printing the pattern and that likely added more fabric than necessary. What would happen if I reprinted the pattern using my actual bicep measurement? Would that correct the cap?

To find out, I’ve reprinted the pattern using my real bicep measurement. The clear pattern on the top is the original pattern printed in 2010 while the white paper is the new one.

For fabric, I’m using this black striped stretch cotton ordered from Fabric.com. To me, it looks like it should be sewn into a manly country western shirt, complete with pointed yokes and pearl snaps. I had expected pant weight fabric. Thank goodness I paid less than $6.00 for it! Just know I won’t be crying too hard if my changes don’t work. Yet, I sure hope they do…


In other breaking sewing news (hold your breath), I started another pair of jeans. My favorite cropped jeans came from Ottobre Woman 05-2008-16.  For this pair, I've lengthened the leg, changed the back waist darts into a yoke, added a coin pocket and traced the back pocket from the only RTW jeans in my closet (Eddie Bauer). As always, I guessed to their placement.

OttobreWoman 05-2008-16


I’ll probably be able to get another project or two from the roll before it is used up and I need to be deciding what type and weight the next one should be.

Happy sewing and Happy New Year!

Tuesday, February 15, 2011

Pattern Auditions - Jeans

Well, it started from wanting to test the Schnittvision, volume 7, pants pattern and has turned into searching for a classic jeans pattern.

My detour occurred innocently enough. I didn’t have a stretch fabric that was appropriate for the Schnittvision pants so I chose to try the jeans instead. And then, being curious, I decided to compare the pattern to BML's version.

Entering identical measurements, I came away with two very different jeans patterns. They both fit. Nevertheless, the BML muslin has a “mom” jeans vibe and though the Schnittvision jeans are more stylish, I want the legs to be looser. Easy to remedy by reprinting the pattern with larger thigh/knee measurements or by simply redrawing the leg seams on the existing pattern. 
Both patterns can be corrected so they would work for me – I just don’t want to. While trying these patterns, I also put together a muslin of Simplicity 7581, view C (the one on the left). I found this bootcut jeans pattern, circa 1997, on eBay. Granted, it is ancient. But, other than taking in the side seams a bit at the hips (I cut a size 18) and shortening the leg, the muslin fits and better yet, it looks right.
I’m not stopping at Simplicity 7581. No, no…In a spirit of generosity, I’m also giving my Burda magazines a rare opportunity and have traced (can you believe it?) 01-2010-136, minus the front inner leg patch piece.
BurdaStyle 01-2010-136

The zippers and topstitching thread have arrived and I even made a trip to JoAnn’s and bought a piece of denim. I’m not thrilled with JoAnn’s denim offerings. Just sayin’.

Monday, February 7, 2011

Sewing Muslins for Jeans - Schnittvision and BML

Since I haven’t found a stretch fabric I’m willing to sacrifice for the Schnittvision pants muslin, I went and printed the Schnittvision jeans pattern included in volume 7 and sewed a muslin.  I basted a zipper into the center front so I would have an easier time evaluating. The fit isn’t too far off, however I’m having to add to the front and back inseams at the crotch. The legs are a bit snug so I sewed a 3/8” seam instead of 5/8”. That took care of that, though I prefer a slight boot cut leg and will be adjusting the pattern from the knee down. I used non-stretch cotton for my muslin. Had I used a stretch fabric, I don’t think any adjustments would be needed.

I’m getting my jeans pattern ready even though the denim won’t be here for a few weeks. Topstitching thread and brass zippers, from Atlanta Thread, should be here tomorrow. I also need to place an order for rivets.  Just need to decide which ones I want.

BML Five Pocket Jeans

Not having had enough of taping sheets of printer paper together, I’ve also printed the pattern for the Bernina My Label jeans.  Hmm...doesn't something seem off with those back pockets?

Once the BML muslin is complete, I’ll compare the two and decide which pattern works best and then go from there.

Tuesday, November 16, 2010

HP Weekender Sunshine Top - The Frankenpattern Version

My plan was to take the leftover fabric from the purple Simplicity 2288 cardigan and make a sleeveless shell.  However, when I laid the fabric out on the cutting table, I saw that there was enough to make a top with sleeves.  I quickly switched gears and pulled the HP Weekender Sunshine Tops pattern from the file.
I really like the neckband on the Simplicity 2598 sleeveless top that I made last week – so much that I combined the neckbands from these two patterns.  I had made changes to the Sunshine neckband pieces when I had made it back in July.  Starting fresh, I traced new neckband pieces, matching them (CF/CB and shoulders) with the Simplicity neckband pieces and then traced my new pattern pieces.  This added close to an inch to the upper edge of the neckband – still feminine but with a more modest, and therefore more wearable, neckline than the original pattern.  By the way, I used a knit interfacing for the neckband and, of course, coverstitched the hems.

The Sunshine pattern offers two sleeve choices: none or a short cap sleeve.  Since I wanted a top appropriate for the season, I borrowed my Bernina My Label t-shirt sleeve pattern and merged it with the Sunshine cap sleeve to create the ¾-length sleeve pattern.

I am delighted with my Sunshine Frankenpattern.  Moreover, the new top is wonderful – it fits!

Monday, October 25, 2010

Bernina My Label Pants – Fitting Evolution

While searching for a belt buckle for the 1952 dress, I took a departure from sewing on it. I want the dress to have ¾ length sleeves and I am still considering how the bottom of the sleeves should be styled. Do I want to use the 4” zippers? Will they be necessary? A cuff? I don’t know….

Last week, I visited several thrift stores and came away without a buckle. I haven’t been anymore successful with online shopping. I did find a vendor that sells buckles you cover with your fashion fabric. Wouldn't that be ideal for this dress? The price of the buckle is a reasonable $2.25. Shipping, however, is $10.25. Somehow, I find that offensive. I mean, the little buckle would fit into a standard letter-sized envelope. $10.25 - really?
Now, I haven’t been idle while figuring out the buckle thing.  I’ve pulled together the other items for the dress and have returned to my abandoned My Label pants pattern. I had thought my fitting issue was the crotch length. Remember the old Gap pants that I had deconstructed a few weeks ago?  Well, I took those pieces and compared them to my pattern.  Other than the waist, they were surprisingly similar.

My previous My Label pants attempts had used muslin-weight fabric.  It wasn’t pretty nor did it reflect what was actually going on with the pattern. This time, I decided to use a heavier fabric.  I had a green cotton (and silk?) fabric that I had ruined by drying it in a too hot dryer with a fabric softener sheet.  I had tried, but failed, to salvage the fabric by treating and rewashing it.  The stains would not come out and so it became test fabric.
As the Gap pieces predicted, the crotch length was just fine though the waist was excessively big.  Other than the crazy waist, the pants fit me better than any others I have purchased or sewn.  The measurement used is my actual waist measurement, so I don’t understand why it is so large.  Maybe I don’t have the various height measurements entered correctly.  Anyway, back to the software for another round...

Knowing that everything else fit, I kept adjusting the waist and printing new waistbands. Finally, I got one that fit my mid-section and I printed out the new pattern. I am in the process of sewing the pants using some leftover fabric.

One thing I have learned about printing the My Label pattern pieces is that it is much easier to individually print the various garment pieces instead of all of them at once. My worktable is small and taping individual pieces means there is less paper hanging over the edge pulling the taped sheets down while trying to line up the cross marks. It does use a few more sheets of paper but not as many expletives are required.  A fair trade in my opinion.
 
Please note the rotary cutter and tiny cutting mat. This is a crafty mat that I have had for many years.  I want to get a large mat but my cutting table folds up when not in use and pretends to be a desk.  The mat would have to be stored and I don’t have anywhere to stash it.  Under my bed? No, I think that would just be bad feng shui.  So, until I work that out, I will just slide the little mat around.  Actually, it is faster and cleaner than using scissors.

Okay, I’m gonna get the pants fitting dealt with and the 1952 dress won’t take long to finish – with or without a buckle.  And, after that I think I want to sew another jacket. My Label?

Monday, July 19, 2010

Bernina My Label T-Shirt – The Alien Version

I sewed this t-shirt last night. This is the same Frankenpattern t-shirt from posts in February. Basically, it is the Bernina My Label T-Shirt pattern with a gathered center front and sleeves shortened to ¾ length. I used the My Label t-shirt sleeve pattern this time, not the Simplicity 4076 bell sleeve.
The fabric, purchased back in February from Fabric.com, is a stretch jersey ITY (Interlock Twist Yarn). Yes, the print is a bit much, but I am going to wear it anyway.  It will be fine for the office.

I have a few other pieces of loud ITY fabric. Expect that they will show up here in one style or another.
 
I found this book, A Vintage Affair: A Novel, written by Isabel Wolff, on Amazon while looking for some light reading. The reviews were good (mostly). The Booklist editorial review on Amazon says that “Readers with a passion for couture fashion will appreciate (and feel vindicated by!) Wolff's well-researched and intricate descriptions of beautiful, significant vintage pieces.” As a result, if I am not sewing - this novel is why!

May this new week treat you well!

Tuesday, February 23, 2010

Shirt - Review


It makes me smile!  The fabric is lovely, quirky and comfortable.  And, it fits!

For the button placement, I simply put a pin at the bust point and measured the distance from the collar band center to the pin.  I split the difference (4") and used that amount to distribute the rest of the buttons. 

Before sewing, I did not trim the collar and stand pieces.  I used the 5/8" seam allowances given.  No problems.  The pattern pieces for this shirt all matched up well and the sleeves eased in like they should.  There will be more shirts in my future!

Monday, February 22, 2010

Shirt - Done!

The shirt is finished and I will post a photo tomorrow.  I am not sure how the print will photograph, but I have to say that I like this shirt.  And, I am pleased with the My Label software!  It worked!  I have made three of the styles from this software:  the tunic, the t-shirt and, now, the buttoned shirt.  This software creates sewing patterns based upon your measurements.

As this was the first attempt from this pattern, I didn't want to dwell on fine sewing technique.  Therefore, I did not flat fell the seams or spend a lot of time on top-stitching.  I am not thrilled with the way I sewed the buttons on.  This was my first shot at sewing on buttons using the button sew-on foot.  I need to do some practicing before my next buttoned project.

Next up - the muslin for Simplicity 4366.

Tuesday, February 16, 2010

Shirt Muslin

I've tried it on and cannot complain. The center fronts overlap without stress, my arms move freely and the sleeve length is correct. As this is a muslin, I did not set the sleeve in properly. I pinned it in flat and basted it - puckers and all! Same for the cuff. Before cutting this out, I will trim the seam allowances from the collar and stand pieces to 1/4".

Monday, February 15, 2010

Thinking about the Shirt

Knowing my preference for comfortable clothing, I purposely left off the front and back vertical darts when I traced the shirt pattern. I have reconsidered. I need to know how accurate the software is. Well, to be honest - the quality of the measurement taking.....I also need to know how this shirt will fit if I intend to manipulate darts to create other styles (I do intend to). The button placement looks off to me. Shouldn't there be a button at the bust point to hold everything together when you move your arms? And, what is up with the 5/8" seam allowance for the collar and stand? All this before I have even sewed up the muslin......

Sunday, February 14, 2010

Shirt Pattern: Traced and Initial Pattern Fitting Complete


I traced the shirt pattern, using 4 mil thick plastic sheeting - the type that is used for painting drop cloths. I prefer to use the plastic instead of paper. It is easy to find - this came from Target. It is wide and transparent. Strength is a bonus as it doesn't tear like tissue paper. I save the larger scraps and sew them together to use for the next round of tracing. I won't win any prizes for pattern beauty, but I can live with that. This looks like it could work. Let's see how it translates into fabric.

My Label Shirt Pattern

Last night, I printed the My Label shirt pattern. Low on printer paper, I opted for the Burda method, laying the pieces atop each other. This makes for 12 sheets of printer paper versus 36 and means less tape, too. The downside: now I will have to trace the pieces. Arghh.....it could be worse. Unlike Burda, at least the seam allowances have already been included. Printer paper has been added to my shopping list......