Friday, October 4, 2013

Changes


So, here I am, a few weeks from my last post, living in Las Colinas. Los Colinas is a part of Irving and Irving is a suburb of Dallas. Had you told me two months ago that this is where I would be, I would have called you a joker. The decision was easy to make as I'm here to be closer to family.

Me and the dog have found a nice place to take walks near my apartment. Isn’t it pretty?

This new apartment is smaller than my last, in fact I’ve stayed in larger hotel rooms! This means I have room for only the basics. My sewing things and the dog are included, but not much else. I have to tell you that this was purposefully done. My goal is to get organized and own only things I really love or must have; all else will go by the wayside. This is a huge transition and one meant to force me into sorting out what is and is not important.

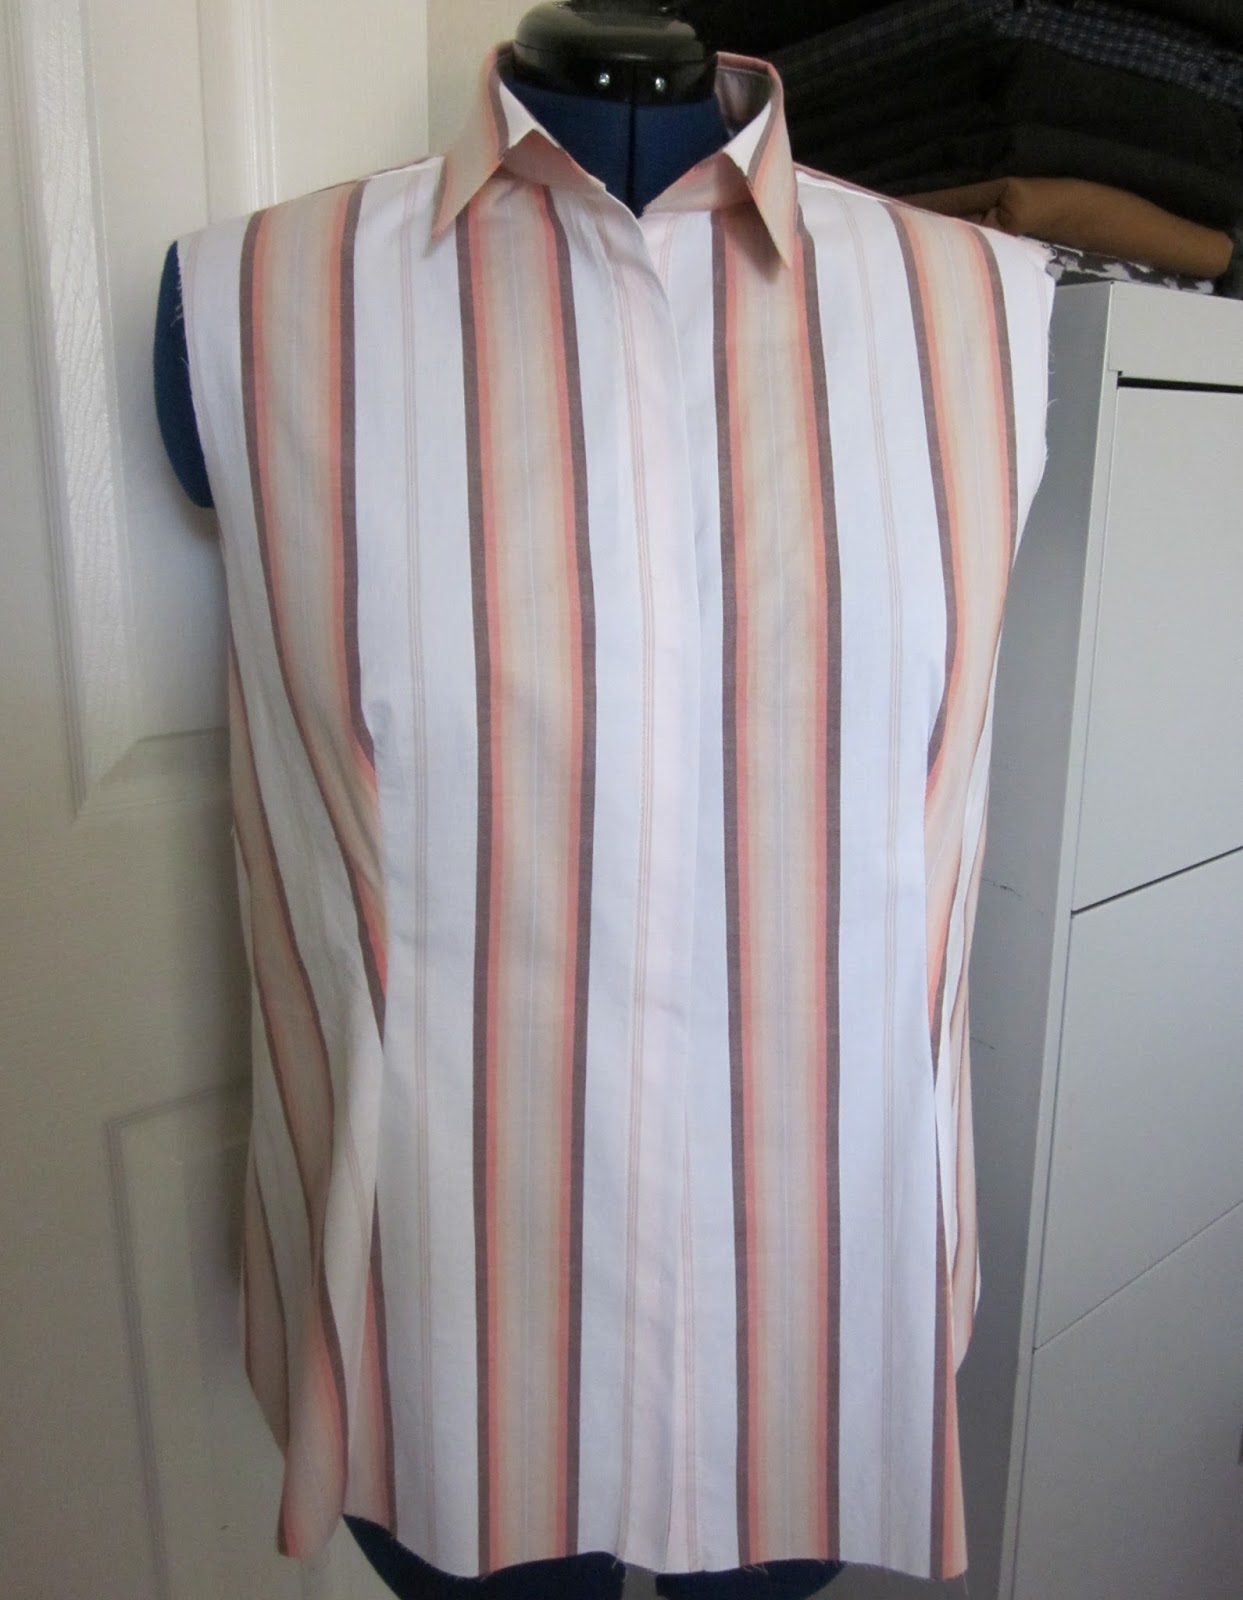
It hasn't been painless but so far nothing too horrible. There has been a ticket and a smashed toenail. My cell phone has zero signal strength in the apartment (wi-fi to the rescue?) and the toilet seat is sized for a young child. On the plus side, the ice maker produces beautifully clear ice and I have been enjoying lots of iced tea (can't find the k-cups for the Breville). Other than that, the sewing machines are still in boxes as are the fabrics, the unfinished Style Arc Jenny shirt and the quilt. Now, I did finish the Style Arc Barb pants before I moved and they fit great! The fabric I chose is better for fall/winter, so for once I’m ahead of the season.

My main living space is floor to ceiling boxes with furniture scrunched in between. There is but a narrow passage to the window blinds wands so I can adjust for natural light. I’m curious how long it will take to sort through and get settled…

I miss sewing.

Sunday, September 1, 2013

The Jenny Shirt - Sleeves


Life got in the way last week and there has been no sewing. None. However, since my last posting, I was able to attach the cuffs to the sleeves and sew one of the sleeves to the shirt.

Back when I traced the pattern, I shortened the sleeve length by one inch because shortening sleeves by one inch has become my standard sleeve adjustment. Once I tried the shirt on, I realized I got it wrong, I’ll have to shorten the sleeves another 1 1/4”. For now, I folded the cuff to the right length – the cuff isn’t that narrow. That is also why the placket isn’t laying flat. Pins and folded fabric, what can I say?

Really, I should just cut new sleeves, plackets, and cuffs and start over. Yet, I won’t because this is a muslin. I’ll remove the cuffs, cut 1 ¼” off the bottom of each sleeve, gather and pleat until it matches the cuff. The plackets are plenty long enough to handle this treatment and since it is a woman’s shirt I think I can get away with a bit of gathering.


Once I get the sleeves in, there is hemming, buttons and buttonholes…say, another two weeks? Hah. Maybe more as the next few weeks promise more of the same time suck for my sewing time.

Style Arc Barb's Stretch Pant
I’ve also started another pair of pants using Style Arc's Barb's Stretch Pant. Just need to attach the waistband and hem. Though narrower, construction of the Barb is the same as the Linda - incredibly easy.

Oh, in a positive move toward finishing the quilt, I broke down and purchased another LaPeirre Studio Supreme Slider. Yes, you should be impressed…

Sunday, August 18, 2013

In Progress: Style Arc’s Jenny Shirt


By now, you know that I am not a blogger who worries about how many yards I sew per month or keeps track of the dollars spent per garment. If I really cared, I suppose I could export a report from Quicken to Excel and break it down by notions, patterns, fabric, equipment, etc. Just know that I really do not care. This sewing thing is both my hobby and my wardrobe. Some people play golf or go to the movies. I sew. 

I buy fabric (mostly on clearance) and patterns (fewer and fewer of the Big 4 lately) that I think will flatter my body and sew it up. Happily, the vast majority of things I make become part of my wardrobe and the few that meet the bin are not mourned. I learn and I move on. One of my challenges is to sew a well-fitting classic shirt. I have sewn the shirt pattern from the Bernina software (Bernina My Label) a few times (here and here); the resulting shirts fit, and I’ve worn them a lot. However, since each of the Style Arc patterns I have sewn have worked so well I wanted to attempt a Style Arc shirt. I chose the Jenny Shirt.

Style Arc Jenny Shirt
 
I had cut this out shortly before (or right after???) moving into my apartment. Anyway, it has been passed over for several months and I finally got around to sewing on it about two weeks ago. The fabric is a $1.00/yd stretch cotton from FabricMart.com, and yes, I have several yards of this one and another similar stripe. You will be seeing it again.
After getting home from the office, I would sew for ten or fifteen minutes before deciding I didn’t like the lighting or I was too tired, etc. Given this pace, I project that it will be another two weeks before it is complete.
 

I wasn’t expecting how the front darts pull the side fronts to the bias. I like it!

Changes made to the pattern? I shortened the sleeves an inch and smoothed out the side seams at the waist. That extra at the waist might not be needed; I’ll wait until it is further along before I commit.
 

I wish I had made an effort to center the stripes on the back piece. When I cut this out, I probably was considering this an unwearable muslin and opted to conserve fabric. There isn’t a guarantee that the shirt will turn out nor do I want to spend time with the seam ripper, so I’m not looking back. Once I have a pattern that works, I’ll take more care. I do want to figure this shirt thing out. To that end, I’ve printed several tutorials that deal with specific parts of shirtmaking and have put them into a notebook. The plan is to update as I come across better techniques.


I guess it is time to start digging through my buttons. Hope I can find some that match.

Enjoy your week!

Sunday, August 4, 2013

Fabriconda #6 – Style Arc Riva Raglan T-Shirt and the Jalie Scoopneck Top


Another lucky unused pattern, the Style Arc Riva Raglan T-Shirt, was chosen for the plaid knit from the Fabriconda. Like most of the Fabriconda fabrics, this one had lots of tape and tape residue. I cut all of that tape stuff away before starting. That way I knew exactly what I had to work with (barely just enough!).

Style Arc Riva Raglan T-Shirt

Looking at the pinned together pattern on the dress form, I could see that the neck was close fitting and the hem long. My only modification was to smooth out the side seams a bit for more room at the waist…

I wore it last week with my Burda Style 01-2010-136/Ottobre bird Capri’s and some cute sandals. The shirt fits nicely and I was comfortable. Enough said.

However, the Fabriconda has freed me up to try patterns that I’ve been hesitant to try. Testing a new pattern is often risky and for that reason alone, it has been well worth the $7.00 spent. After all, patterns aren’t much good if they don’t get used.

And yet the next top did not come from the Fabriconda.  This Fabric Mart ITY has been on the shelf for several months. With confidence from the success of the Jalie Raglan Tee, #3245, I went forward with the Jalie Scoopneck Top, #2806.


This is view B with the 3/4 sleeves from view A. The fit and comfort of this top is simply wonderful and the style is appropriate for office garb. I’m restraining myself from gathering every piece of knit fabric here and turning them into this top! Seriously, I so wish I had attempted this one a long time ago!

Jalie Scoopneck Tops #2806

Oh, the quilt has been calling my name…

Thursday, July 25, 2013

Fabriconda #5 - Style Arc Island Ali Top


Two pieces of knit burnout from the Fabriconda came together to make this top. The blue piece had a huge circle cut from the middle and what was left was the perfect amount for the sleeves. Sadly, I didn't have enough of the grey to center the front properly (yes, I cut it after the back...). I also had to cut the lower back piece on the crosswise. Just know that I'm going to wear it anyway and the world will go on...


The wooly nylon thread came out of the drawer and I used it for the rolled hem on the sleeves. I really like how it allows the fabric to drape nicely.


Style Arc Island Ali Top Sewing Pattern

I hadn't sewn a top like this before, so before starting, I read the instructions (pretty basic but adequate) and had to look to the pattern pieces for the hem length and a few other things. As I've found typical with Style Arc knit top patterns, I had to shorten the neck binding (guessing worked). Other than that and the rolled hem for the sleeves, there weren't any other changes.


I will wear this with a pair of grey Capris I'd made a few months ago. This top is far from perfect but for a wearable muslin I'm pretty happy about it and I'll definitely sew it again! I think it would make a nice dress, too. Don't you?

Wednesday, July 24, 2013

Fabriconda #4 – Style Arc Abby Cardi


I’ve spent the past few weeks building a stack of prepped patterns. When it threatened to fall over, it was time to begin matching them to fabric.


One of the patterns, the Style Arc Abby Cardi, I’ve had since it was first offered but I wasn’t ambitious enough to change out the plate on my old serger to sew a rolled hem. Now, with the new one, I just have to turn a knob and I’ve been looking for an excuse to try it. The manual recommends using wooly nylon thread in the upper and lower loopers, but there was only black and white wooly nylon in the drawer. So, red serger thread was the choice and it worked just fine. I used a large eyed needle to pull the tails through the hem threads on the back and applied a bit of Fray Check to seal after trimming.

 
Soon after I got the new serger, I bought it a present: an elasticator presser foot. I’ve been looking to streamline the clear elastic/twill tape shoulder procedure and for a few dollars thrown at eBay I was able to do that. The foot feeds the elastic through while encasing it in the stitching. You can adjust how much you want the elastic stretched while stitching; say, for example, when sewing elastic to the leg of a swimsuit. For the shoulders, I let it feed the elastic without any stretching. I understand that the purpose of the foot is to evenly stitch stretched elastic onto fabric but I don't know why I couldn't also use it to run twill tape onto woven fabrics. Another experiment for another day...

Elasticator Foot - Side View

Elasticator Foot - Top View

There were two pieces of the red knit fabric within the Fabriconda and both had wide masking tape residue parallel to the selvages. It was tricky business getting the pieces to fit and there was just enough leftover to test out the rolled hem.
 

I did not make many changes to the pattern. Just the usual one inch taken from the sleeve length and straightening of the side seams to provide a bit more room for my mid-section. It wasn’t necessary. In fact, the cardi was shapeless and baggy. I went back to the original pattern side seams and I think it looks great!

With the Texas high temperatures, I doubt I’ll get to wear it before October. No problem as this was all about testing the pattern, the rolled hem, and the elasticator foot. All were successful and in the meantime, I intend to sew the short-sleeved version in a lightweight knit to wear over a camisole or tank.

Next? I’m thinking Style Arc’s Island Ali Top combined with more fabric from the Fabriconda.

Tuesday, July 2, 2013

Style Arc's Gorgeous Gore Skirt


I was looking through my basket of “want-to-sew-soon” patterns on Sunday and came across Style Arc’s Gorgeous Gore Skirt pattern. I’ve been wanting to sew a simple summer skirt and this one fit the bill: no zipper or sewn-on waistband.

Style Arc Gorgeous Gore Skirt

Less than two hours later, I had my new skirt and I absolutely love it! The animal print ITY came in a Fabric Mart bundle. I hadn’t considered it for a skirt, but the fabric is perfect for this pattern.

There are only two pattern pieces, the upper yoke (front and back use the same piece) and the gores (six – again, all the same). I used ½” elastic for the waist instead of the 1/4” specified. Why? Because that is what I had in the drawer and it worked just fine.

Other changes? I under-stitched the yoke facing, using the coverstitch, instead of top-stitching through both layers at the skirt top. Also, the coverstitch was used for the row of stitching beneath the elastic. The waist has to be able to stretch to get over the hips. No way straight stitching won't pop.

I wore my new skirt to the office on Monday and I felt dressed up, yet so comfortable! I think I’m on to something here…

Sunday, June 23, 2013

Fabriconda #3 - Burda 08-2011-138


The Fabriconda bag had several small pieces of cotton fabric of similar weight. The fact that they did not coordinate was of no concern. I pulled out a TNT top pattern, Burda Style 08-2011-138, and had fun. I have sewn this pattern several times. This round the sleeve was shortened one inch. I have yet to make it with the back button closure, and wasn't interested in tackling it for this top.


Burda Style 08-2011-138

This selection of fabrics had many flaws and tape residue that had to be worked around. By combining the undamaged bits, there was just enough for my top.


To help pull together the disparate prints, I added a scrap of the floral to the center front neckband along with the tab and a button I found in the stash. Like the recent Jaile t-shirt and the Rachel Comey top, I had to sew pieces together to get fabric long enough for the pattern pieces.

Front

Back

I would not have deliberately planned for this combination of fabrics, but you know, I was amused and I believe it will pair nicely with my new black capris...

Saturday, June 22, 2013

Fabriconda #2 - Vogue 1247


Well, I'd used my first version of this pattern testing and diagnosing the ailing serger. Not only was the polyester top a mess inside, but the fabric just felt icky. Being too short was the kicker and into the bin it went. I am not sorry.

Still curious about the pattern, I made a few changes and chose this cotton Samsung fabric from the Fabriconda. Tell me, is this the same Samsung that makes phones and TVs?


There were five or six small pieces of this print in the Golden D'or bag and that meant for some creative piecing. None were long enough to cut the back in one piece so I created a seam, matching the one on the front, and cut the fabric on the cross-wise grain. Although appreciated, the triangular bits on the front were eliminated as I deemed this print quite busy enough, thank you very much. The bottom front was cut cross-wise to match the back.


The pattern instructions call for French seams. I ignored that and used the serger. As far as I know, the French seam police are not out looking for me...Now, if I had used a silk or silk-like fabric, I would have had to sew French seams.

Exploiting a Tammyriffic standard, I altered the neckline. Take a look at the line drawing below. Doesn't that look awfully wide to you? It did to me so I took my faithful French curve to it.


Here is what I did to the back pattern piece:


While I was adjusting, I also fixed the length of the top:


Yes, I have wandered from Ms. Comey's design. It will be okay.

Sunday, June 16, 2013

Jalie 3245 - The Raglan Tee


I have a lot of patterns. Some would say I have more than I could ever use and they would be right. Yet, that doesn’t prevent me from buying more. These days, I purchase most of them online and once in my possession, I scan the front and back of the envelopes and file them first by pattern company and then by number. I’ve turned the PDFs into my personal pattern catalog by grouping them together by categories: skirts, tops, dresses, etc. I keep the ones I want to make soon in a basket by the Bernina. Having those Golden D’or remnants got me to thinking about trying one that has been patiently waiting, Jalie 3245.

Jalie 3245

I took my measurements and a leap of faith and traced the size that matched. And, to give my faith a bit of insurance, I also compared it to my Style Arc Susan t-shirt pattern. It was spot on.

The fabric for this first t-shirt came from a Wal-Mart $1 or $2/yard cotton knit. There wasn’t enough length for the sleeves, so I quickly serged scraps on to make pieces that would work. I wouldn’t have thought to do that otherwise. I like it.

But, what I didn’t like was my bra straps at the edge of the neckline threatening to show every time I moved. Therefore, this second version has a neckline with one inch less exposure. It doesn’t change the look (can you even tell?) but makes me much more comfortable. I started with the top back of the sleeve (which is actually the neck) and, using the French curve, gradually added one inch to the top of the sleeve and the front neckline. The back stayed the same.


The orange stripe is a soft stretchy cotton from the Golden D’or bag. There was barely enough for the front and back and I didn’t even try to match the stripes though it doesn’t look bad. I want to say the grey and white knit was from a Fabric Mart bundle. Anyway, there is enough of it to make something else later.

I love this pattern and it has so much potential!


The eBay serger arrived. I chose this model at it was pretty close to the one I had. The tension disks are different and you don’t have to change the needle plate to do a rolled hem, but other than that they are very similar. It wasn’t used much at all but will have its chance!

Have a wonderful week!

Wednesday, June 12, 2013

One Step Forward...


Once home, I made quick work of getting those Golden D'or Fabric Outlet pieces inspected and washed. After serious culling, the remaining fabrics are worth the seven dollars paid. The picture above is a sampling. Don't know that I would do that again, but it was amusing to see what was in that bag!

Before the Dallas trip, I completed a pair of capris (Ottobre Woman Every-Woman's Pants 05-2008-16), the Classic Flares (Ottobre Woman 02-2013-20) and a pair of cropped pants using Burda 7068. They were all made from the same $1.99/yd black windowpane cotton fabric purchased from FabricMart.com. Same fabric, same thread and so I couldn't help but put them together assembly line style. Did it save any time? Maybe yes, maybe no. But it was satisfying when I had three new garments all at once. I didn't take photos mainly because details on black fabric do not show up well and besides, nothing you haven't seen me make before. Just pants.


Soon after the assembly line ended, I started the Vogue 1247 Rachel Comey top and was pleased that I'd pinned the pattern to the dress form before cutting the fabric. The top would have been way too large had I gone with the size that matched my measurements. I chose a less-than-wonderful floral polyester and all went well until I went to overlock. The usually dependable Kenmore was skipping stitches and I blamed it on the polyester. I switched out needle sizes and types and unthreaded and rethreaded the machine. It didn't help. Finally, I removed all thread and rotated the hand wheel. Yep, sure enough, the looper was hitting the back of the needle plate. It wasn't loose nor did it look odd. I removed the plate and laid it flat on the table. Flat? Shouldn't it be flat? Nope, it was like a rocking chair...


See that triangular piece on the right of the needle plate? It was bent. I took pliers to it and that corrected the skipped stitches. No clue as to how it got bent. Not trusting it to remain flat, I bought a replacement from eBay, swapped them out and the the machine stitches like new. Now, in my panic before I determined the problem was the needle plate, I overreacted and there is a similar model (via eBay) on its way.


The quilt? It is resting as:
  • I ripped the Supreme Slider by catching it on the needle when removing it from the Bernina. I'm hoping I can find some type of tape that will keep me from having to buy another one anytime soon - any ideas? I also somehow managed to stitch through it.
  • I quilted to the edge of a panel where I should have left a seam allowance. Yes, I have some unstitching to do and I'm not happy about it...
 

In other news, DD #1 gifted me some Robert Kaufman fat quarters from the Passage to India collection. I love the prints and was able to find more online. I'm in no hurry to decide what these fabrics will become. Aren't they beautiful?

Saturday, June 8, 2013

Golden D'or Fabric Outlet

Guest Blog by GG & DD#2:

DALLAS (TX) - A hot June morning in Texas started with a quest.  Visitors traveled to the Golden D'or Fabric Outlet in search of fabric... and unprecedented adventure.  

SewThereTammy was on the scene, and encountered a wild beast she had never seen in all her days: the $7 Fabriconda.


Upon sight, our hero Tammy instinctively grasped the fabric snake by the head before wrestling it to the cash register, stopping only to make sure that its contents were at least as interesting as the multiple other snakes swarming in the pit below.

"Ain't nobody got time to search for them there derned fabric pieces one by one" she was heard mumbling as she pulled the snake out to the car and loaded it in the trunk.

News 10 was able to privately interview Tammy this afternoon.  During this interview, Tammy revealed that she later cut the snake open to reveal her prize: the snake's mysterious fabric contents.

"Just like any road kill I done seen, there's gon' be scrap.  But you really gotta look at each piece to find them sweet, sweet gems worth keepin'."  Although about half of the fabric in the snake was torn, stained, taped, or contained mysterious permanent marker symbols, Tammy believes the remainder will be useful for muslins, shirts, and other various projects.

As for Tammy, she's taking the night off after a rough day of Fabriconda fighting.

Sunday, April 14, 2013

The “Take a Break from the Quilt” Quilt


So, this is what happens when you need to find room for some newly purchased thread and you come across the forgotten and untested Bernina walking foot.


As soon as I saw it, I went straight to my box of quilting fabrics. Minutes later, I had a bunch of 5 1/2" squares that I stitched into nine-patch blocks.


Each nine-patch block was cut in half both vertically and horizontally. After rotating the upper left and lower right squares 180 degrees, the blocks were sewn back together. Yes, you are correct. This is the called the disappearing nine-patch block.


It didn’t take long to get to the quilting part and that walking foot really did keep the layers together. Granted, some of the stitching lines are wobbly but I can’t fault the walking foot. I marked a few of them with chalk, but due to impatience, I mostly eyeballed it. Just so you know, chalk works…guessing? Hmm, not so much.


Once the binding was on and all loose threads clipped, I tossed it into the washer and dryer. I love the wrinkly transformation!


The crib-sized quilt is 45” x 60” and will become a gift.

It makes me smile.