Friday, October 4, 2013

Changes


So, here I am, a few weeks from my last post, living in Las Colinas. Los Colinas is a part of Irving and Irving is a suburb of Dallas. Had you told me two months ago that this is where I would be, I would have called you a joker. The decision was easy to make as I'm here to be closer to family.

Me and the dog have found a nice place to take walks near my apartment. Isn’t it pretty?

This new apartment is smaller than my last, in fact I’ve stayed in larger hotel rooms! This means I have room for only the basics. My sewing things and the dog are included, but not much else. I have to tell you that this was purposefully done. My goal is to get organized and own only things I really love or must have; all else will go by the wayside. This is a huge transition and one meant to force me into sorting out what is and is not important.

It hasn't been painless but so far nothing too horrible. There has been a ticket and a smashed toenail. My cell phone has zero signal strength in the apartment (wi-fi to the rescue?) and the toilet seat is sized for a young child. On the plus side, the ice maker produces beautifully clear ice and I have been enjoying lots of iced tea (can't find the k-cups for the Breville). Other than that, the sewing machines are still in boxes as are the fabrics, the unfinished Style Arc Jenny shirt and the quilt. Now, I did finish the Style Arc Barb pants before I moved and they fit great! The fabric I chose is better for fall/winter, so for once I’m ahead of the season.

My main living space is floor to ceiling boxes with furniture scrunched in between. There is but a narrow passage to the window blinds wands so I can adjust for natural light. I’m curious how long it will take to sort through and get settled…

I miss sewing.

Sunday, September 1, 2013

The Jenny Shirt - Sleeves


Life got in the way last week and there has been no sewing. None. However, since my last posting, I was able to attach the cuffs to the sleeves and sew one of the sleeves to the shirt.

Back when I traced the pattern, I shortened the sleeve length by one inch because shortening sleeves by one inch has become my standard sleeve adjustment. Once I tried the shirt on, I realized I got it wrong, I’ll have to shorten the sleeves another 1 1/4”. For now, I folded the cuff to the right length – the cuff isn’t that narrow. That is also why the placket isn’t laying flat. Pins and folded fabric, what can I say?

Really, I should just cut new sleeves, plackets, and cuffs and start over. Yet, I won’t because this is a muslin. I’ll remove the cuffs, cut 1 ¼” off the bottom of each sleeve, gather and pleat until it matches the cuff. The plackets are plenty long enough to handle this treatment and since it is a woman’s shirt I think I can get away with a bit of gathering.


Once I get the sleeves in, there is hemming, buttons and buttonholes…say, another two weeks? Hah. Maybe more as the next few weeks promise more of the same time suck for my sewing time.

Style Arc Barb's Stretch Pant
I’ve also started another pair of pants using Style Arc's Barb's Stretch Pant. Just need to attach the waistband and hem. Though narrower, construction of the Barb is the same as the Linda - incredibly easy.

Oh, in a positive move toward finishing the quilt, I broke down and purchased another LaPeirre Studio Supreme Slider. Yes, you should be impressed…

Sunday, August 18, 2013

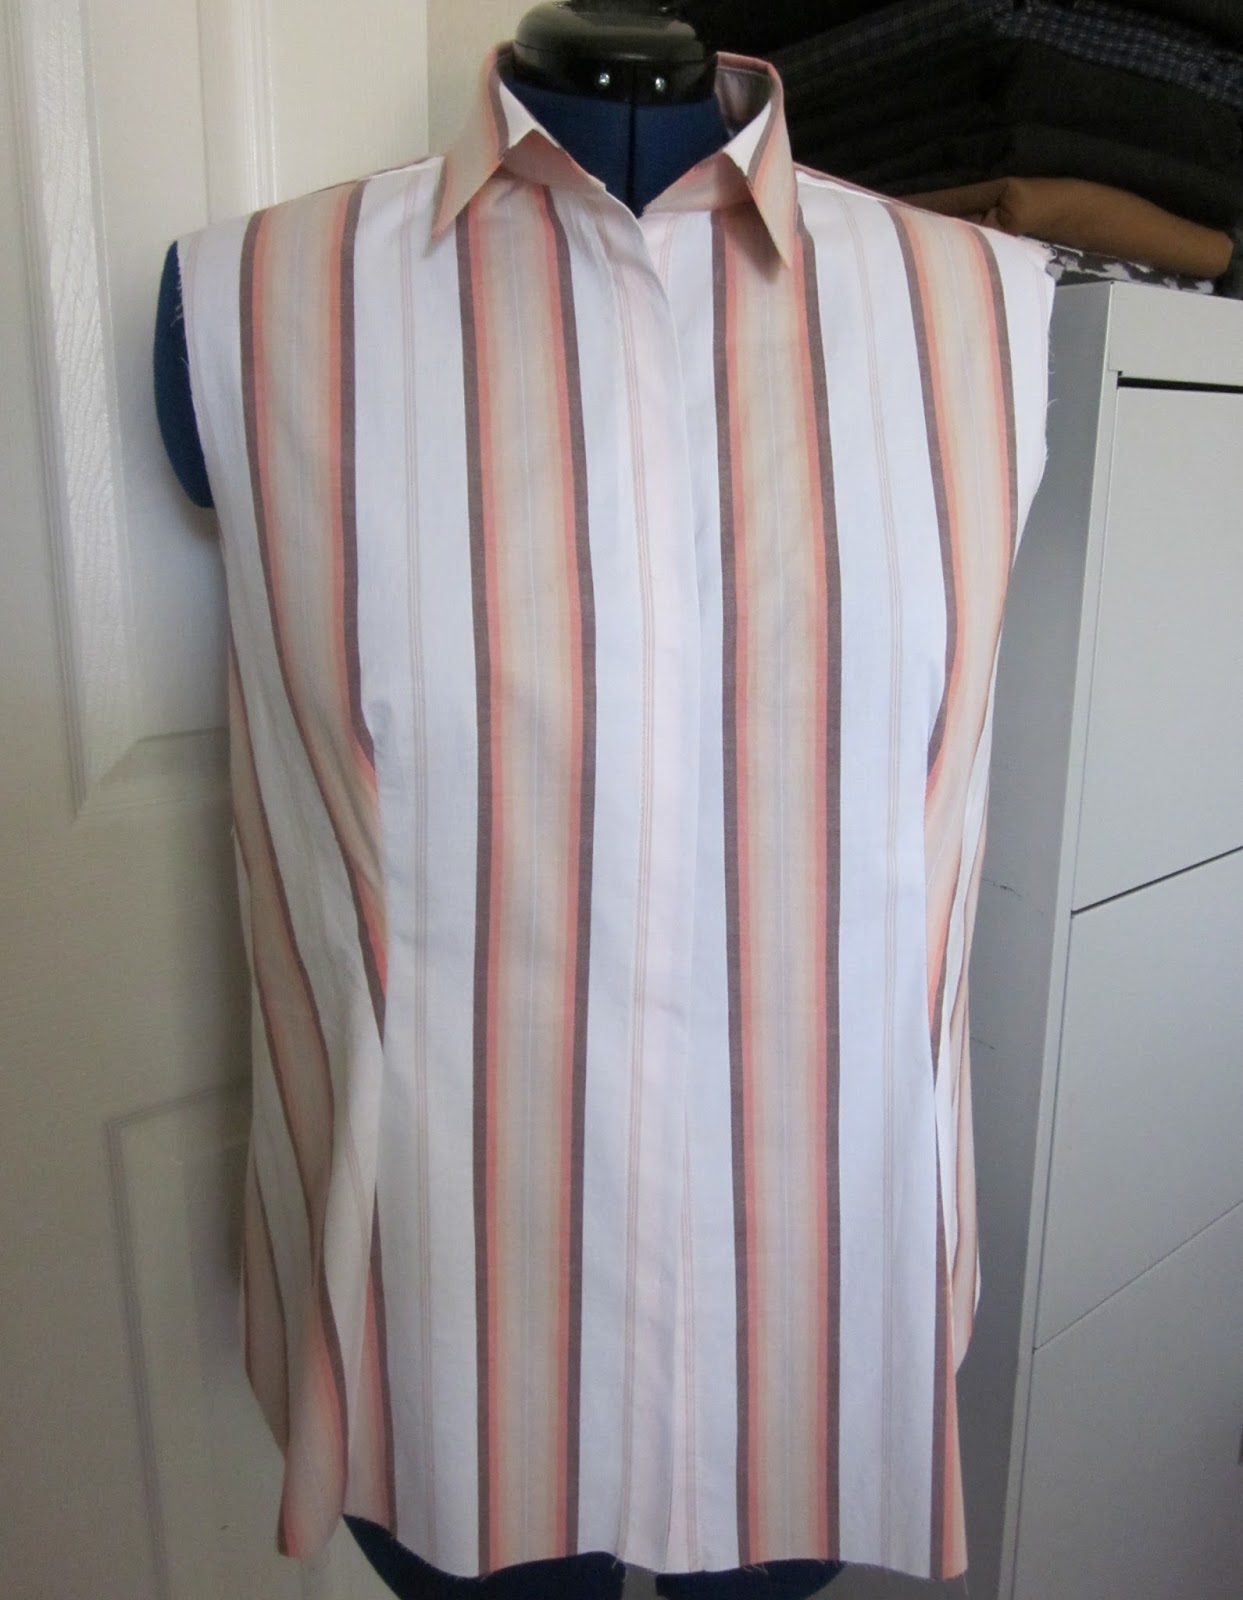
In Progress: Style Arc’s Jenny Shirt


By now, you know that I am not a blogger who worries about how many yards I sew per month or keeps track of the dollars spent per garment. If I really cared, I suppose I could export a report from Quicken to Excel and break it down by notions, patterns, fabric, equipment, etc. Just know that I really do not care. This sewing thing is both my hobby and my wardrobe. Some people play golf or go to the movies. I sew. 

I buy fabric (mostly on clearance) and patterns (fewer and fewer of the Big 4 lately) that I think will flatter my body and sew it up. Happily, the vast majority of things I make become part of my wardrobe and the few that meet the bin are not mourned. I learn and I move on. One of my challenges is to sew a well-fitting classic shirt. I have sewn the shirt pattern from the Bernina software (Bernina My Label) a few times (here and here); the resulting shirts fit, and I’ve worn them a lot. However, since each of the Style Arc patterns I have sewn have worked so well I wanted to attempt a Style Arc shirt. I chose the Jenny Shirt.

Style Arc Jenny Shirt
 
I had cut this out shortly before (or right after???) moving into my apartment. Anyway, it has been passed over for several months and I finally got around to sewing on it about two weeks ago. The fabric is a $1.00/yd stretch cotton from FabricMart.com, and yes, I have several yards of this one and another similar stripe. You will be seeing it again.
After getting home from the office, I would sew for ten or fifteen minutes before deciding I didn’t like the lighting or I was too tired, etc. Given this pace, I project that it will be another two weeks before it is complete.
 

I wasn’t expecting how the front darts pull the side fronts to the bias. I like it!

Changes made to the pattern? I shortened the sleeves an inch and smoothed out the side seams at the waist. That extra at the waist might not be needed; I’ll wait until it is further along before I commit.
 

I wish I had made an effort to center the stripes on the back piece. When I cut this out, I probably was considering this an unwearable muslin and opted to conserve fabric. There isn’t a guarantee that the shirt will turn out nor do I want to spend time with the seam ripper, so I’m not looking back. Once I have a pattern that works, I’ll take more care. I do want to figure this shirt thing out. To that end, I’ve printed several tutorials that deal with specific parts of shirtmaking and have put them into a notebook. The plan is to update as I come across better techniques.


I guess it is time to start digging through my buttons. Hope I can find some that match.

Enjoy your week!

Sunday, August 4, 2013

Fabriconda #6 – Style Arc Riva Raglan T-Shirt and the Jalie Scoopneck Top


Another lucky unused pattern, the Style Arc Riva Raglan T-Shirt, was chosen for the plaid knit from the Fabriconda. Like most of the Fabriconda fabrics, this one had lots of tape and tape residue. I cut all of that tape stuff away before starting. That way I knew exactly what I had to work with (barely just enough!).

Style Arc Riva Raglan T-Shirt

Looking at the pinned together pattern on the dress form, I could see that the neck was close fitting and the hem long. My only modification was to smooth out the side seams a bit for more room at the waist…

I wore it last week with my Burda Style 01-2010-136/Ottobre bird Capri’s and some cute sandals. The shirt fits nicely and I was comfortable. Enough said.

However, the Fabriconda has freed me up to try patterns that I’ve been hesitant to try. Testing a new pattern is often risky and for that reason alone, it has been well worth the $7.00 spent. After all, patterns aren’t much good if they don’t get used.

And yet the next top did not come from the Fabriconda.  This Fabric Mart ITY has been on the shelf for several months. With confidence from the success of the Jalie Raglan Tee, #3245, I went forward with the Jalie Scoopneck Top, #2806.


This is view B with the 3/4 sleeves from view A. The fit and comfort of this top is simply wonderful and the style is appropriate for office garb. I’m restraining myself from gathering every piece of knit fabric here and turning them into this top! Seriously, I so wish I had attempted this one a long time ago!

Jalie Scoopneck Tops #2806

Oh, the quilt has been calling my name…

Thursday, July 25, 2013

Fabriconda #5 - Style Arc Island Ali Top


Two pieces of knit burnout from the Fabriconda came together to make this top. The blue piece had a huge circle cut from the middle and what was left was the perfect amount for the sleeves. Sadly, I didn't have enough of the grey to center the front properly (yes, I cut it after the back...). I also had to cut the lower back piece on the crosswise. Just know that I'm going to wear it anyway and the world will go on...


The wooly nylon thread came out of the drawer and I used it for the rolled hem on the sleeves. I really like how it allows the fabric to drape nicely.


Style Arc Island Ali Top Sewing Pattern

I hadn't sewn a top like this before, so before starting, I read the instructions (pretty basic but adequate) and had to look to the pattern pieces for the hem length and a few other things. As I've found typical with Style Arc knit top patterns, I had to shorten the neck binding (guessing worked). Other than that and the rolled hem for the sleeves, there weren't any other changes.


I will wear this with a pair of grey Capris I'd made a few months ago. This top is far from perfect but for a wearable muslin I'm pretty happy about it and I'll definitely sew it again! I think it would make a nice dress, too. Don't you?

Wednesday, July 24, 2013

Fabriconda #4 – Style Arc Abby Cardi


I’ve spent the past few weeks building a stack of prepped patterns. When it threatened to fall over, it was time to begin matching them to fabric.


One of the patterns, the Style Arc Abby Cardi, I’ve had since it was first offered but I wasn’t ambitious enough to change out the plate on my old serger to sew a rolled hem. Now, with the new one, I just have to turn a knob and I’ve been looking for an excuse to try it. The manual recommends using wooly nylon thread in the upper and lower loopers, but there was only black and white wooly nylon in the drawer. So, red serger thread was the choice and it worked just fine. I used a large eyed needle to pull the tails through the hem threads on the back and applied a bit of Fray Check to seal after trimming.

 
Soon after I got the new serger, I bought it a present: an elasticator presser foot. I’ve been looking to streamline the clear elastic/twill tape shoulder procedure and for a few dollars thrown at eBay I was able to do that. The foot feeds the elastic through while encasing it in the stitching. You can adjust how much you want the elastic stretched while stitching; say, for example, when sewing elastic to the leg of a swimsuit. For the shoulders, I let it feed the elastic without any stretching. I understand that the purpose of the foot is to evenly stitch stretched elastic onto fabric but I don't know why I couldn't also use it to run twill tape onto woven fabrics. Another experiment for another day...

Elasticator Foot - Side View

Elasticator Foot - Top View

There were two pieces of the red knit fabric within the Fabriconda and both had wide masking tape residue parallel to the selvages. It was tricky business getting the pieces to fit and there was just enough leftover to test out the rolled hem.
 

I did not make many changes to the pattern. Just the usual one inch taken from the sleeve length and straightening of the side seams to provide a bit more room for my mid-section. It wasn’t necessary. In fact, the cardi was shapeless and baggy. I went back to the original pattern side seams and I think it looks great!

With the Texas high temperatures, I doubt I’ll get to wear it before October. No problem as this was all about testing the pattern, the rolled hem, and the elasticator foot. All were successful and in the meantime, I intend to sew the short-sleeved version in a lightweight knit to wear over a camisole or tank.

Next? I’m thinking Style Arc’s Island Ali Top combined with more fabric from the Fabriconda.

Tuesday, July 2, 2013

Style Arc's Gorgeous Gore Skirt


I was looking through my basket of “want-to-sew-soon” patterns on Sunday and came across Style Arc’s Gorgeous Gore Skirt pattern. I’ve been wanting to sew a simple summer skirt and this one fit the bill: no zipper or sewn-on waistband.

Style Arc Gorgeous Gore Skirt

Less than two hours later, I had my new skirt and I absolutely love it! The animal print ITY came in a Fabric Mart bundle. I hadn’t considered it for a skirt, but the fabric is perfect for this pattern.

There are only two pattern pieces, the upper yoke (front and back use the same piece) and the gores (six – again, all the same). I used ½” elastic for the waist instead of the 1/4” specified. Why? Because that is what I had in the drawer and it worked just fine.

Other changes? I under-stitched the yoke facing, using the coverstitch, instead of top-stitching through both layers at the skirt top. Also, the coverstitch was used for the row of stitching beneath the elastic. The waist has to be able to stretch to get over the hips. No way straight stitching won't pop.

I wore my new skirt to the office on Monday and I felt dressed up, yet so comfortable! I think I’m on to something here…