Sunday, April 14, 2013

The “Take a Break from the Quilt” Quilt


So, this is what happens when you need to find room for some newly purchased thread and you come across the forgotten and untested Bernina walking foot.


As soon as I saw it, I went straight to my box of quilting fabrics. Minutes later, I had a bunch of 5 1/2" squares that I stitched into nine-patch blocks.


Each nine-patch block was cut in half both vertically and horizontally. After rotating the upper left and lower right squares 180 degrees, the blocks were sewn back together. Yes, you are correct. This is the called the disappearing nine-patch block.


It didn’t take long to get to the quilting part and that walking foot really did keep the layers together. Granted, some of the stitching lines are wobbly but I can’t fault the walking foot. I marked a few of them with chalk, but due to impatience, I mostly eyeballed it. Just so you know, chalk works…guessing? Hmm, not so much.


Once the binding was on and all loose threads clipped, I tossed it into the washer and dryer. I love the wrinkly transformation!


The crib-sized quilt is 45” x 60” and will become a gift.

It makes me smile.

Tuesday, April 2, 2013

Burda Plus 01-2013-433


I’m still working on the third panel of the quilt. I chuckle and chortle every time I unfold the panels to inspect my silliness! Nothing planned – just whatever I feel like stitching at the moment. Anyway, that last panel will be finished soon enough and then the next challenge will be uniting them. For some reason I worry that they won’t match up. I know it is illogical as each and every block was squared up.

Burda Plus 01-2013-433

So, taking a break from the quilt, I stitched up a woven t-shirt/tunic. This one is 433 from the Burda Plus Spring/Summer 2013 magazine. I used a silk/cotton blend that I’ve had for a few years. I want to say that it came from Fabric Mart, but I'm not really sure...


After pinning the pattern pieces together to check the fit on the dress form, I modified the too-wide-for-me neckline. Brought it in about an inch at the shoulders. And, to compensate for the smaller opening, dropped the center front about an inch or so. Don't know that it was really necessary, but that is what I did.

The length of the t-shirt/tunic was shortened as my intent was to sew a top and not a dress. The only other change was to the binding. The coverstitch machine did not want to bind over seams. The outside of the stitched binding looked fine, but flip it over and you can see that it produced loops, not completed stitches over the seamed areas. After a few tries, I surrendered and instead folded the bias strips in half and sewed them onto the neckline and the bottom of the sleeves using a ¼” seam allowance. Then, to finish, I serged and edge-stitched. If I hadn’t been in a hurry, I probably could have sorted it out. Maybe it was the needle. Maybe it was the tension or perhaps the fabric itself. Who knows?  Who cares? It worked.

Neckline Finish

Sleeve Finish

You can bet this pattern will be used again. Perfect for anything light and drapey in the stash. Oh, wait. That is what Burda recommends…

Sunday, March 17, 2013

Two Out of Three Ain’t Bad


Two of the strips are quilted, one more to go and I think I have an idea of what is supposed to be happening. Only I am not there yet as my stitch quality could be better.

And, no doubt, I am breaking all sorts of other quilting rules – some I know about and some I have yet to discover. It doesn’t matter…the mismatched colors, patterns, and off-grain pieces tickle me.

Known rules broken:

  • Total disregard for color and print harmony in chosen fabrics
  • No pre-shrinking of the cotton batting yet the cotton fabrics went through the washer and dryer (by the way, this was a conscious decision)
  • Not utilizing a stitch regulator for the FMQ (does one even exist for the Bernina 930 Record? I would use one if I had one…)
  • Stitching with 100% cotton machine quilting thread vs. a polyester or polyester/cotton machine quilting thread (polyester = superior strength)
Oh, well…I love how this quilt is turning out!

Sunday, March 3, 2013

FMQ Started

Pinmoors engaged (I love these things!):


Backing fabric:


The Bernina - ready with feed dogs down and stitch length set to zero:


Progress:


Detail:


I’m loving this free motion quilting thing. In fact, I think I’m addicted. Once I got started, I didn’t want to stop! The first panel is almost finished.

The slider, gloves, pin anchors and the Teflon bobbin insert all worked as hoped. Me? Well, I need more practice with my stitching. Notice the small and large stitches – they should all be the same size. Go fast and produce huge stitches. Move slowly and get teeny tiny stitches.


There are two panels left so I’m looking forward to more consistent stitches…

Sunday, February 24, 2013

And I Thought a Ruler and a Darning Foot Would be Enough…


The Bernina has returned. It had a thorough cleaning, a check-up/tune-up and, fortunately, nothing was seriously wrong. Something had come loose on the inside on the hand wheel and it just needed to be tightened. It works great and I am delighted to have it back!

The more I read quilting books and blogs (and watch YouTube quilting videos), the more I realize the same tools keep showing up and I get to thinking that maybe I could use a few of them. Now, don’t you worry, I haven’t gone and bought a mid-arm sewing machine, but the following have made their way to me:

  • A Supreme Slider free motion machine quilting mat (has a Teflon top to allow the fabric to easily slide across the bed of the machine)
  • Machinger gloves (the fingertips have a polyurethane coating to get a better grip on the fabric sandwich as it is being quilted)
  • Teflon bobbin washers (placed in the bobbin case before adding the bobbin, they encourage better tension and stitching)
  • Pinmoors (easier to use than safety pins to keep the layers together)


I'll let you know how these work for me.

My current strategy has the blocks joined into three strips with each strip two blocks wide and seven blocks long. I am hoping it will be easy to quilt the strips leaving about two inches unquilted on the inner edges. Once the strips are connected, I’ll come back and quilt those blank areas. It works in my head…


While waiting for the Bernina, I put together a new top using a pattern I've been curious about. The fabric is from a FabricMart.com bundle and the pattern is the Style Arc Cate’s Cousin top. Both pattern and fabric have been here awhile – and with winter about over, my timing is definitely off. However, I’d rather have a top waiting in the closet than folded fabric on the shelf.


Next? A free motion quilting experiment involving a block that did not measure up. Stay tuned.

Sunday, February 10, 2013

Machine Swaps


Last week, the Bernina 930 Record quit sewing. At first, turning the hand wheel would get it going again. This would happen sporadically, then at the beginning of every seam. Then, every few stitches…

I did what I could by taking apart the bobbin case area, verifying that no loose threads were causing mischief. Next, the feed dogs were exposed and the compacted fuzz removed. No change. Finally, I took off the lid and looked inside. It was clean and nothing obviously broken or out of place and no ugly noises came when turning the hand wheel. Maybe it is the foot pedal. Perhaps unseen thread caught somewhere…who knows?

I finally gave up and took it to the Bernina shop. They tell me it will be at least two weeks before I hear from them. Once they figure out what is wrong, it may be several more days before it is ready. It will receive a cleaning and tune-up while it is there.


So, without the trusted 930, I turned to my thrift store find, the Bernina Activa 140, and was able to finish piecing the blocks. I’d purchased a ¼” patchwork foot, similar to the one for the 930. I’d also gotten a FMQ (free motion quilting) foot. The foot was fine, but I had no luck with the stitch tension on any of my samples. I spent hours trying to get it right. It even got to the point where I was building a spreadsheet to record the various combinations of upper and bobbin case adjustments. If the top tension looked right, the lower was off and vice versa. Perhaps it needs a visit to the Bernina shop too, though the machine sews just fine without the batting… 
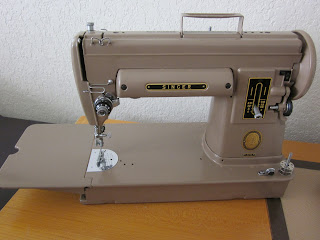

With two machines down, my eyes spotted the Singer 301A case under the sewing table. I’d bought this machine back in 2011 and hadn’t taken the time to clean it up and make it mine. Today was the day. I changed out the smelly felt liner on the oil drip pan. Once removed, I repeatedly washed the pan with warm water and lots of Dawn dishwashing detergent. A new felt pad was applied and no more smell.


Inside, the machine was clean, except for a few globs of old grease around the gears. I wiped them out, applied fresh oil and grease, and then made a trip to Hancock’s for a generic FMQ foot (approximately $18.00). Once home, I attached the foot and started quilting yet another batting sandwich sample. This time, the stitching, top and bottom, is wonderful! In addition, the machine makes a lovely sound. I am happy.

Now I need to figure out my plan for quilting the blocks. My choices:

  • Quilting using a unique stitching design for each block
  • Consisent stitching for each block – because they are already busy enough
My samples haven’t had any seams. Maybe it is a good idea to quilt one with several seams before deciding…

Look at what my sister sent me:

Sunday, January 27, 2013

Adjustments


My quilt is taking another detour even as I’m getting the hang of sewing accurate seam allowances. A few of the blocks are off an 1/8” but I’m not wearing out the seam ripper as all of the fabric strips were cut on the crosswise grain and along with that comes some built in stretch. Welcome compensation for any of my cutting, sewing, or pressing gaffes.

I love the blast of colors. However, in no way do they represent the Little Red Riding Hood pillow. Click-happy on Fabric.com, I introduced several other colors not found in my pillow. If the cotton prints didn’t have spaceships or ducks, and the price was reduced to six dollars or less a yard, I considered adding it to my cart. That is how the oranges, purples and pinks got invited. I know my fabrics do not coordinate. It was intentional.

I’m to the point where I need to consider how to join the blocks so they can be easily quilted. First off, there is a serious size change. Eventually the entire quilt gets sewn together on the machine. Struggling with a king-size quilt while learning a new technique is perhaps overly ambitious. So the plan has changed from king-size to a twin and its gonna be okay.